Tuesday, September 22, 2020

NumPy - Python Library for Numerical Computing

NumPy is primarily used to store and process multi-dimensional array. NumPy is preferred instead of Python List because its performance is better while working on large arrays. NumPy uses fixed (data) types and hence there is no type checking when iterating through objects. NumPy also uses less memory bytes to represent the array in memory and utilizes a contiguous memory, which makes it more efficient to access and process large arrays. NumPy allows insertion, deletion, appending and concatenation, similar to the Python List, but also provides a lot more additional functionality. For an example, NumPy allows to multiple each element of two arrays using a*b were a, b are arrays. NumPy array allows SIMD Vector Processing and Effective Cache Utilization. NumPy is used as a replacement for MatLab, plotting with Matplotlib, images storage and machine learning. NumPy also forms the backend core component for Pandas library.

NumPy is installed using "pip install numpy" command.

NumPy Data Types

NumPy has additional data types compared to the regular Python data types, i.e. strings, integer, float, boolean, complex. The data types is referred using one character, like i for integers, u for unsigned integers etc. Below is a list of all data types in NumPy and the characters used to represent them.
  • i - integer
  • b - boolean
  • u - unsigned integer
  • f - float
  • c - complex float
  • m - timedelta
  • M - datetime
  • O - object
  • S - string
  • U - unicode string
  • V - fixed chunk of memory for other type ( void )
Arrays

NumPy allows to represent multi-dimensional arrays compared to the built in array module of python which only supports single dimensional arrays. A NumPy array is a grid of values, all of the same type, and is indexed by a tuple of nonnegative integers. The array object in NumPy is called ndarray, it provides a lot of supporting functions that make working with ndarray very easy. Array can be created by passing a list, tuple or any array-like object into the array() method. Methods of creating arrays are array(), linspace(), logspace(), arange(), zeros(), ones(). Arrays can be initialized using nested python lists, and elements can be accessed using square brackets.
Once the array is created, it has many attributes which describe the NumPy array. The shape of an array is the number of elements in each dimension. Shape attribute is represented by the a tuple with each index having the number of corresponding elements, or the size of the array along each dimension. The ndim attribute provides the number of dimensions i.e. the rank of the array.
from numpy import *

# Create a rank 1 array i.e. single dimensional array
arr1 = array{[1, 2, 4, 5, 6]}

# Passing a type while creating an array
arr2 = array{[6, 8, 9, 4, 4], int}

arr3 = array([[9.0,8.0,7.0],[6.0,5.0,4.0]])

print(arr1.shape)            # Prints "(5)", means array has 1 dimension which has 5 elements.
print(arr3.shape)            # Prints "(2,3)", means array has 2 dimensions, and each dimension has 3 elements.

print(type(arr1))            # Prints ">class 'numpy.ndarray'<"

print(arr1.ndim)             # Prints number of dimensions in the array

arr1[0] = 5                  # Change an element of the array

Functions to Create Arrays

Numpy also provides many functions to create arrays such as zeros(), ones(), full(), random() which initialize the new array with zeros, ones, other numbers, random values respectively.
# Create an array/matrix of all zeros
np.zeros((2,3))             # 2-Dimensional matrix with all zeros
np.zeros((2,3,3))           # 3-Dimensional matrix with all zeros
np.zeros((2,3,3,2))         # 4-Dimensional matrix with all zeros

# Create an array/matrix of all ones
np.ones((4,2,2))
np.ones((4,2,2), dtype='int32')

# Create an array/matrix with any other constant value
np.full((2,2), 99)          # 2-Dimensional matrix with all 99 number
np.full((2,2), 99, dtype='float32')   # float numbers

# Any other number matrix with full-like shape method
d = np.array([[1,2,3,4,5,6,7],[8,9,10,11,12,13,14]])

np.full_like(d, 4)      # returns array([[4,4,4,4,4,4,4],[4,4,4,4,4,4,4]]) were all values are 4

# alternatively we can use
np.full(a.shape, 4)

# Initialize a matrix of random decimal numbers
np.random.rand(4,2,3)

np.random.rand_sample(d.shape)

# Initialize a matrix of random integer numbers, with range 0 to 7
np.random.randint(7, size=(3,3))

# Initialize random integer numbers, with range -4 to 8
np.random.randint(-4,8, size=(3,3))

# Identity matrix
np.identity(3)                                         # returns array([[1, 0, 0],
                                                       #                [0, 1, 0],
                                                       #                [0, 0, 1]])

arr1 = np.array([1,2,3])

# repeat the array
r1 = np.repeat(arr1, 3, axis=0)                        # returns [1 1 1 2 2 2 3 3 3]

arr2 = np.array([[1,2,3]])
r2 = np.repeat(arr, 3, axis=0)                         # returns [[1 2 3]
                                                       #          [1 2 3]
                                                       #          [1 2 3]]

The arange() method allows to create an array based on numerical ranges. It creates an instance of ndarray with evenly spaced values and returns the reference to it. It takes the start number which defines the first value of the array, and the stop value which defines the end of the array and which isn't included in the array. arrange() method also takes the step argument which defines spacing between two consecutive values, and the dtype which is the type of elements of the output array.
import numpy as np

arr = np.arange(start=1, stop=10, step=3)
print(arr)                           # array([1, 4, 7])

arr = np.arange(start=1, stop=10)
print(arr)                           # array([1, 2, 3, 4, 5, 6, 7, 8, 9])

# starts array from zero and increment each step by one
array = np.arange(5)
print(arr)                           # array([0, 1, 2, 3, 4])

arr = np.arange(5, 1, -1)            # counting backwards
print(arr)                           # array([5, 4, 3, 2])

Datatypes

Every numpy array is a grid of elements of the same type. Numpy provides a large set of numeric datatypes as discussed above that can be used to construct arrays. Numpy tries to guess a datatype when we create an array. The array() function also provides an optional argument 'dtype' to explicitly specify the datatype of the elements. The NumPy array object has a property called dtype that returns the data type of the array.
import numpy as np

a = np.array([1,2,3])

print(a.dtype)            # Prints "int64" i.e. datatype of the array

c = np.array([1,2,3], dtype='S')        # Create array with elements as string data type
c = np.array([1,2,3], dtype='i4')       # Create array with elements as integer with 4 bytes
c = np.array([1,2,3], dtype='int16')    # Create array with elements as integer with 2 bytes

# Get Size
print(a.itemsize)   # prints 4 for int32 element size
print(c.itemsize)   # prints 2 for int16 element size

# Get total size
a.size * a.itemsize   # 1st method
a.nbytes              # 2nd method

Iterating Arrays

Arrays are iterated using regular for loops regardless of their dimensions. NumPy also provides a special nditer() function which helps from very basic to very advanced iterations. It enables to change the datatype of elements while iterating using op_dtypes argument and pass it the expected datatype. An additional argument flags=['buffered'] is passed to provide extra buffer space as data-type change does not occur in place. nditer() also supports filtering and changing the step size. To enumerate the sequence numbers of the elements of the array while iteration, a special ndenumerate() method can be used.
import numpy as np

arr = np.array([[[1, 2], [3, 4]], [[5, 6], [7, 8]]])

for x in arr:
  for y in x:
    for z in y:
      print(z)


# iterating using nditer() function
for x in np.nditer(arr):
  print(x)


for idx, x in np.ndenumerate(arr):
  print(idx, x)

Array Math

Basic mathematical functions operate elementwise on arrays, and are available both as operator overloads and as functions in the numpy module. NumPy allows arithmetic operations on each element of the array.
arr1 = array{[1, 2, 4, 5, 6]}
arr2 = array{[6, 8, 9, 4, 4]}

arr1 = arr1 + 5              # Add 5 to all elements of an array
arr1 += 2                    # Add 2 to all elements of an array
arr1 ** 2                    # Multiply 2 to all elements of an array

# Add elements of two arrays in order. Also called as Vector Operations
arr3 = arr1 + arr2           # returns array { 7, 10, 13, 9, 10 }

print(sqrt(arr1))           # Find square root of each element of the array
print(sin(arr1))            # Find sin value of each element of the array

# Find sum of the array
print(sum(arr1))
print(sort(arr1))

Copy / Clone Array

NumPy allows to copy/clone arrays using the view() function for shallow copy, and the copy() function for deep copy of the array. The copy() function creates a new array while the view() function creates just a view of the original array. The copy owns the data and any changes made to the copy will not affect original array, and any changes made to the original array will not affect the copy. The view does not own the data and any changes made to the view will affect the original array, and any changes made to the original array will affect the view.
a = np.array([1,2,3,4])
# Copy an array arr1 to arr2. The address of both the arrays is same, as both arr1 and arr2 are pointing to same array.
arr2 = arr1

# Clone the array into another array. But its a shallow copy, were elements are still having same address
arr2 = arr1.view()

# Clone the array into another array using deep copy
arr2 = arr1.copy()

# since array arr2 is copy of array arr1, changing arr2 will not change any elements in arr1
arr2[0] = 100

The data type of the existing array can be changed only by making a copy of the array using the astype() method. The astype() function creates a copy of the array, and allows to specify the data type using a string like 'f' for float, 'i' for integer etc as a parameter.
import numpy as np

arr = np.array([1.1, 2.1, 3.1])

newarr1 = arr.astype('i')
newarr2 = arr.astype('int32')

Reorganizing Arrays

The shape of an array is the number of elements in each dimension. NumPy allows to reshape an existing array by allowing to add or remove dimensions or change number of elements in each dimension. NumPy allows to flatten the array i.e. convert a multidimensional array into a 1D array using flatten() function. Alternatively reshape(-1) can also be used to flatten the array. Further Numpy's vstack() function is used to stack the sequence of input arrays vertically to make a single array.
from numpy import *

arr1 = array({
              [1,2,3],
              [4,5,6]
            })

arr1 = array([1, 2, 3, 4, 5, 6, 7, 8, 9, 10, 11, 12])

arr1 = arr1.flatten()            # flatten from multi dimensional to single dimensional array
print(arr1)                      # array([1,2,3,4,5,6])

# reshape single dimensional array to multi dimensional array
newarr = arr.reshape(2, 3, 2)    # The outermost dimension has 2 arrays which contains 3 arrays, each with 2 elements
print(newarr)                    # array([[[ 1  2], [ 3  4], [ 5  6]],  [[ 7  8], [ 9 10], [11 12]]])

before = np.array([[1,2,3,4], [5,6,7,8]])

after = before.reshape((4, 2))                                    # returns [[1 2]
                                                                  #          [3 4]
                                                                  #          [5 6]
                                                                  #          [7 8]]

# Vertically stacking vectors

v1 = np.array([1,2,3,4])
v2 = np.array([5,6,7,8])

np.vstack([v1,v2,v1,v2])                                    # returns array([[1,2,3,4]
                                                            #                [5,6,7,8]
                                                            #                [1,2,3,4]
                                                            #                [5,6,7,8]])

# Horizonral stacking vectors

h1 = np.ones((2,4))
h2 = np.zeros((2,2))

np.vstack([h1,h2])                                    # returns array([[1, 1, 1, 1, 0, 0],
                                                      #                [1, 1, 1, 1, 0, 0]])

Concatenate Arrays

The concatenate() function is used to join the arrays which are joined based on the axis to concatenate along. The arrays are passed to the concatenate() function are as a tuple, which can alternatively be also passed as a Python List. The arrays passed to concatenate() function requires to be of the same data type. Arrays in NumPy have axes which are directions, e.g. axis 0 is the direction running vertically down the rows and axis 1 is the direction running horizontally across the columns. The concatenate() function can operate both vertically and horizontally based on the axis argument specified. If we set axis = 0, the concatenate function will concatenate the NumPy arrays vertically which is also the default behavior if no axis is specified. On the other hand, if we manually set axis = 1, the concatenate function will concatenate the NumPy arrays horizontally.

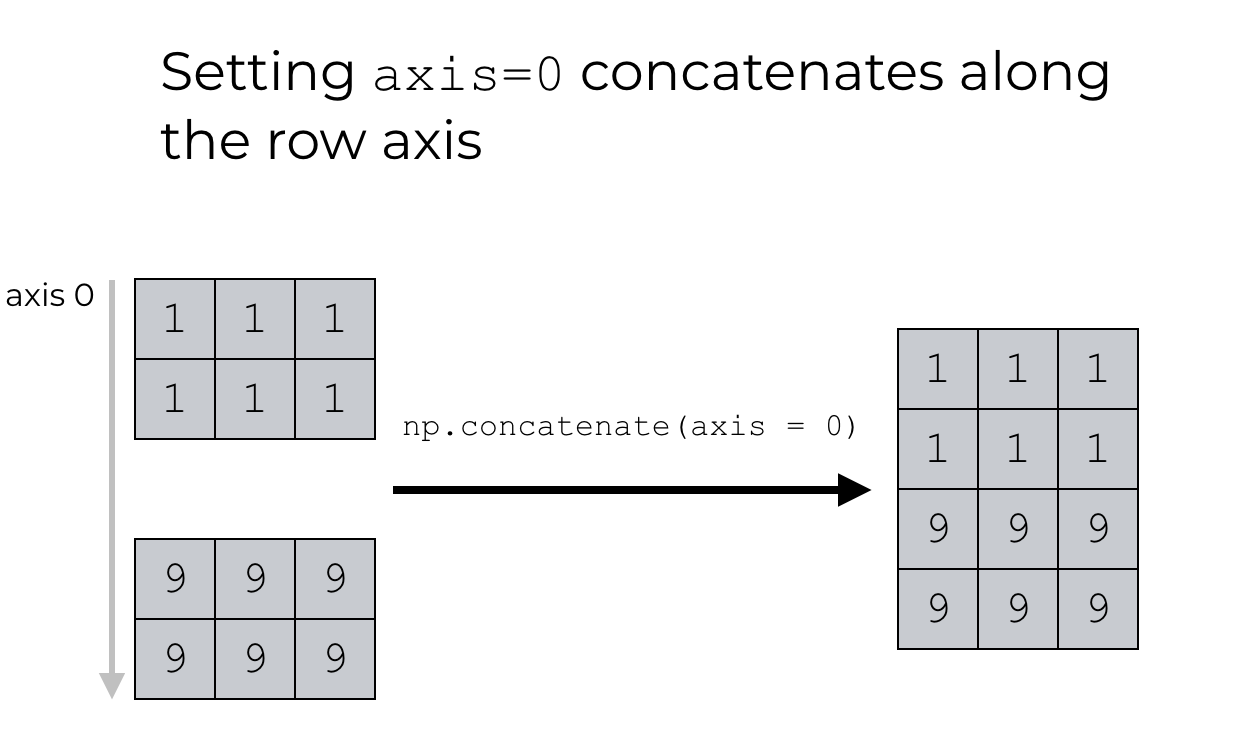
import numpy as np

arr1 = np.array([[1, 2], [3, 4]])
arr2 = np.array([[5, 6], [7, 8]])

arr = np.concatenate((arr1, arr2), axis=0)
print(arr)                                              # array([[1,2], [3,4], [5,6], [7,8]])

arr = np.concatenate((arr1, arr2), axis=1)
print(arr)                                              # array([[1,2,5,6], [3,4,7,8]])

Stacking

Stacking is similar as concatenation, the only difference is that stacking is done along a new axis. A sequence of arrays to be joined are passed to the stack() method along with the axis. If axis is not explicitly passed it is taken as 0. NumPy provides helper functions such as hstack() to stack along rows, vstack()  to stack along columns and dstack() to stack along height i.e. depth.
import numpy as np

arr1 = np.array([1, 2, 3])
arr2 = np.array([4, 5, 6])

arr = np.stack((arr1, arr2), axis=1)
print(arr)

arr = np.hstack((arr1, arr2))
print(arr)

arr = np.vstack((arr1, arr2))
print(arr)

arr = np.dstack((arr1, arr2))
print(arr)

Splitting Array

The array_split() function takes an array and number of split as arguments to break the array into multiple parts.
import numpy as np

arr = np.array([1, 2, 3, 4, 5, 6])

newarr = np.array_split(arr, 4)
print(newarr)

arr = np.array([[1, 2, 3], [4, 5, 6], [7, 8, 9], [10, 11, 12], [13, 14, 15], [16, 17, 18]])

newarr = np.array_split(arr, 3)
print(newarr)

newarr = np.array_split(arr, 3, axis=1)
print(newarr)

Searching Arrays

The where() method allows to search an array for a certain value, and return the indexes for the matched elements. Another method called searchsorted() performs a binary search in the array, and returns the index where the specified value would be inserted to maintain the search order. The searchsorted() method starts the search from the left by default and returns the first index where the argument number is no longer larger than the next value. By specifying the argument side='right' it allows to return the right most index instead.
import numpy as np

arr = np.array([1, 2, 3, 4, 5, 4, 4])

x = np.where(arr == 4)
print(x)

x = np.where(arr%2 == 0)
print(x)

arr = np.array([1, 3, 5, 7])

x = np.searchsorted(arr, 3)
print(x)

x = np.searchsorted(arr, [2, 4, 6])
print(x)

NumPy's all() method tests all the array elements along a given axis if it evaluates to True. The any() method tests any array element along a given axis if it evaluates to True. In other words, numpy.any() method returns True if at least one element in an array evaluates to True while numpy.all() method returns True only if all elements in a NumPy array evaluate to True. NumPy also allows conditional operators to check the condition on each element of the array, and allows to 'and'/'or' the boolean arrays to get a cumulative result.
import numpy as np

arry = np.array([1, 2, 73, 4, 5, 89, 54, 34, 102])

# Find any value in the column has a value which is greater than 50
x = np.any(arry > 50, axis=0)
print(x)                                     # True

#Find the columns which has all the values that are grater than 50
x = np.all(arry > 50, axis=0)
print(x)                                     # False

#Find the rows which has all the values that are grater than 50
x = np.all(arry > 50, axis=1)
print(x)                                     # True

# Find values in array greater than 50 and less than 100
x = ((arry > 50) & (arry < 100))
print(x)                                     # [False, False, True, False, False, True, True, False, False]

# negation of above condition
x = (~((arry > 50) & (arry < 100)))
print(x)                                     # [True, True, False, True, True, False, False, True, True]

Sorting Arrays

Arrays can be sorted in numeric or alphabetical order with ascending or descending order.
import numpy as np

arr = np.array([[3, 2, 4], [5, 0, 1]])

print(np.sort(arr))

arr = np.array(['banana', 'cherry', 'apple'])

print(np.sort(arr))

Filtering Arrays

NumPy allows to filter an array using a list of booleans corresponding to indexes in the array. If the value at an index is True that element is contained in the filtered array, otherwise when False it is excluded from the filtered array. The filtered array can be created by hardcoding True/False values, or using a filter variable as a substitute for the filter array.
import numpy as np

arr = np.array([41, 42, 43, 44])

x = [True, False, True, False]

newarr = arr[x]
print(newarr)

filter_arr = arr > 42

newarr = arr[filter_arr]
print(newarr)

NumPy ufuncs

Computation of NumPy arrays is enhanced when used the vectorized operations, generally implemented through NumPy's universal functions (ufuncs). Vectorized operation simply performs an operation on the array, which will then be applied to each element. Such vectorized approach is designed to push the loop of processing each array element into compiled layer of NumPy, which leads to much faster execution. Vectorized operations in NumPy are implemented via ufuncs, whose main purpose is to quickly execute repeated operations on values in NumPy arrays. Computations using vectorization through ufuncs are nearly always more efficient than their counterpart implemented using Python loops, especially as the arrays grow in size.

Ufuncs exist in two flavors, unary ufuncs which operate on a single input, and binary ufuncs which operate on two inputs. ufuncs usually take array under operation along with additional arguments such as 'where' which is a boolean array or condition, 'dtype' which defines the return type of elements and 'out' which is the output array where the return value could be copied. Below are wide range of examples of ufuncs.
# Array Arithmetic Operations

x = np.arange(4)
print("x     =", x)
print("x + 5 =", x + 5)
print("x - 5 =", x - 5)
print("x * 2 =", x * 2)
print("x / 2 =", x / 2)
print("x // 2 =", x // 2)  # floor division
print("-x     = ", -x)
print("x ** 2 = ", x ** 2)
print("x % 2  = ", x % 2)

# Absolute Value

x = np.array([-2, -1, 0, 1, 2])
abs(x)

# Trigonometric functions

theta = np.linspace(0, np.pi, 3)
print("theta      = ", theta)
print("sin(theta) = ", np.sin(theta))
print("cos(theta) = ", np.cos(theta))
print("tan(theta) = ", np.tan(theta))

# Exponents and Logarithms

x = [1, 2, 3]
print("x     =", x)
print("e^x   =", np.exp(x))
print("2^x   =", np.exp2(x))
print("3^x   =", np.power(3, x))
print("ln(x)    =", np.log(x))
print("log2(x)  =", np.log2(x))
print("log10(x) =", np.log10(x))

# Aggregates

x = np.arange(1, 6)
np.add.reduce(x)         # reduce repeatedly applies a given operation to the elements of an array until only a single result remains.
np.multiply.reduce(x)

np.add.accumulate(x)     # stores all the intermediate results of the computation

Boolean Masking and Advance Indexing

Masking in python and data science is when you want manipulated data in a collection based on some criteria. Masking allows to extract, modify, count, or otherwise manipulate values in an array based on some criterion. NumPy enables boolean masking to create a special type of array called Masked Array. A masked array is created by applying scalar (conditional operator) to NumPy array.
# Load Data from File containing (1,2,73,4,5,89...)
filedata = np.genfromtext('data.txt', delimiter=',')

filedata > 50
# returns array([[False, False, True, False, False, True]])

# Index using the condition, i.e. grab the value if its greater than 50
filedata[filedata > 50]
# returns array([73, 89])

# We can pass index as a list to fetch values in NumPy
g = np.array([1,2,3,4,5,6,7,8,9])
g[[1,2,8]]  # returns array([2, 3, 9])

# Pass multiple array index for each dimension
k = np.array([[1,2,3], [4,5,6], [7,8,9]])
k[[1,2],[2,2]]
# returns array([6, 9])

# another example with slicing
k[[1,2], 3:]

Matrix

Matrix module contains the functions which return matrices instead of arrays. It contains functions which represent arrays in matrix format. A matrix is a specialized 2-D array in NumPy that retains its 2-D nature through operations. It has certain special operators, such as * (matrix multiplication) and ** (matrix power). The matrix() function returns a matrix from an array of objects or from the string of data. The asmatrix function interprets the input as matrix. The methods zeros(), ones(), rand(), identity() and eye() returns matrix with zeros, ones, random values, square identity matrix and matrix with ones on diagonal respectively.
arr1 = array({ [1,2,3], [4,5,6] })
m1 = matrix(arr1)                # convert 2D array to a matrix
m2 = matrix('1 3 6 : 4 6 7')     # create matrix
m2.diagonal()                    # returns diagonal elements in the matrix   
m3  = m1 * m2                    # multiply matrices

Slicing

Slicing in python means taking elements from one given index to another given index. Similar to Python lists, numpy arrays can be sliced. Since arrays may be multidimensional, you must specify a slice for each dimension of the array. Slice is represented instead of index like [start:end:step]. The default values for start is 0, end is the length of the array in that dimension and step is 1. Negative slicing is achieved by using the minus operator to refer to an index from the end.
d = np.arrary([[1,2,3,4,5,6,7],[8,9,10,11,12,13,14]])

# Get a specific element [r, c]
d[1, 5]  # returns 13
d[1, -2] # returns 13

# Get a specific row
d[0, :]

# Get a specific column
d[:, 2]

# Getting [startindex:endindex:stepsize]
d[0, 1:6:2]     # get elements between 2nd and 7th with alternate numbers
d[0, 1:-1:2]

# Change value of the element
a[1,5] = 20

# Set value of 3rd column to 5
a[:,2] = 5

a[:,2] = [1,2]

e = np.array([[[1,2],[3,4]],[[5,6],[7,8]]])

# Get specific element (work outside in)
b[0,1,1] = 4

b[:,1,:]    # returns array([[3,4], [7,8]])

# Replace values in 3-dimensional array
b[:,1,:] = [[9,9],[8,8]]

# Returns array([[[1,2],[9,9]],[[5,6],[8,8]]])

Generate Random Number

NumPy offers the random module to work with random numbers. The randint() function when passed the integer will generate a random number from 0 until the integer argument. It also takes a size parameter which specifies the shape of an array, in order for randint() to return a multi-dimensional array of random integers. NumPy also has the choice() method which allows to generate a random value based on an array of values.
from numpy import random

print(random.randint(100))     # random integer between 0 to 100

print(random.rand())     # random float between 0 and 1

x=random.randint(100, size=(5))
print(x)                # prints an array containing 5 random integers from 0 to 100

x = random.randint(100, size=(3, 5))
print(x)                 # prints 2-D array with 3 rows, each row containing 5 random integers from 0 to 100

x = random.choice([3, 5, 7, 9])
print(x)                 # prints one of the values randomly from the passed array

x = random.choice([3, 5, 7, 9], size=(3, 5))
print(x)                 # prints 2-D array with 3 rows, each row containing 5 values from passed array

Linear Algebra

NumPy package contains numpy.linalg module that provides all the functionality required for linear algebra. Below are some of the important functions in this module.

dot: It returns the dot product of two arrays. For 2-D vectors, it is the equivalent to matrix multiplication. For 1-D arrays, it is the inner product of the vectors. For N-dimensional arrays, it is a sum product over the last axis of a and the second-last axis of b.
import numpy.matlib 
import numpy as np 

a = np.array([[1,2],[3,4]]) 
b = np.array([[11,12],[13,14]]) 
np.dot(a,b)                        # returns [[37,40], [85,92]] 

vdot: It returns the dot product of the two vectors. If the first argument is complex, then its conjugate is used for calculation. If the argument id is multi-dimensional array, it is flattened.
import numpy as np 
a = np.array([[1,2],[3,4]]) 
b = np.array([[11,12],[13,14]]) 
print np.vdot(a,b)                  # prints 130

inner: It returns the inner product of vectors for 1-D arrays. For higher dimensions, it returns the sum product over the last axes.
import numpy as np 
a = np.array([[1,2], [3,4]]) 
b = np.array([[11, 12], [13, 14]]) 

print np.inner(a,b)        # returns   [[35 41]
                           #            [81 95]]

outer: Returns the outer product of two vectors.

matmul: It returns the matrix product of two 2-D arrays. For arrays with dimensions above 2-D, it is treated as a stack of matrices residing in the last two indexes and is broadcast accordingly.
import numpy.matlib 
import numpy as np 

a = [[1,0],[0,1]] 
b = [[4,1],[2,2]] 
print np.matmul(a,b)        # returns   [[4  1] 
                            #            [2  2]] 

determinant: It calculates the determinant from the diagonal elements of a square matrix. For a 2x2 matrix [[a,b], [c,d]], the determinant is computed as ‘ad-bc’. The larger square matrices are considered to be a combination of 2x2 matrices.
import numpy as np

a = np.array([[1,2], [3,4]]) 
print np.linalg.det(a)               # returns -2.0

solve: It gives the solution of linear equations in the matrix form.

inv: It calculates the inverse of a matrix. The inverse of a matrix is such that if it is multiplied by the original matrix, it results in identity matrix.
import numpy as np 
a = np.array([[1,1,1],[0,2,5],[2,5,-1]]) 

ainv = np.linalg.inv(a) 
print(ainv)

Statistics

Numpy supports various statistical calculations using the various functions that are provided in the library like Order statistics, Averages and variances, correlating, Histograms. NumPy has a lot in-built statistical functions such as Mean, Median, Standard Deviation and Variance.
x = [32.32, 56.98, 21.52, 44.32, 55.63, 13.75, 43.47, 43.34]

# Functions to Find Mean, Median, SD and Variance

mean = np.mean(X)
print("Mean", mean)                  # 38.91625

median = np.median(X)
print("Median", median)              # 43.405

sd = np.std(X)
print("Standard Deviation", sd)      # 14.3815654029

variance = np.var(X)
print("Variance", variance)          # 206.829423437

# Functions to Find Min, Max and Sum

stats = np.array([[1,2,3], [4,5,6]])

np.min(stats)                        # returns 1
np.min(stats, axis=0)                # returns [1, 2, 3]  as all the minimum values in top row

np.max(stats, axis=1)                # returns [3, 6]

np.sum(stats)                        # adds all elements and returns 21
np.sum(stats, axis=0)                # adds columns and returns array([5, 7, 9])

Histograms

NumPy has a numpy.histogram() function that is a graphical representation of the frequency distribution of data. The histogram() function mainly works with bins i.e. class intervals and set of data given as input. The numpy.histogram() function takes the input array and bins as two parameters. The successive elements in bin array act as the boundary of each bin. Numpy histogram function will give the computed result as the occurrances of input data which fall in each of the particular range of bins. That determines the range of area of each bar when plotted using matplotlib. Matplotlib enables to convert the numeric representation of histogram into a graph. The plt() function of pyplot submodule takes the array containing the data and bin array as parameters and converts into a histogram.
import numpy as np
from matplotlib import pyplot as plt 

arr = np.array([22,87,5,43,56,73,55,54,11,20,51,5,79,31,27]) 
# returns (array([3, 4, 5, 2, 1]), array([  0,  20,  40,  60,  80, 100]))                                                                   

hist = np.histogram(arr, bins=[0,20,40,60,80,100])

plt.hist(arr, bins=[0,20,40,60,80,100])
plt.title("histogram") 
plt.show()


Sunday, September 13, 2020

Python - A Brief Tutorial

Python is a programming language which was first released in 1991. It has stood the test of time and after nearly 30 years it is still widely used in software industry. The simplicity and concise syntax of python with growing number of libraries and framework still makes it one of the language of choice. Today python is used in web scraping, data science, machine learning, image processing, NLP, data processing and many more areas.

Python language is a specification and has multiple implementations of it e.g. CPython (widely used standard implementation), PyPy, IronPython, Jython. IronPython is python implementation written in C# targeting Microsoft’s .NET framework and uses .Net Virtual Machine for execution. PyPy is python implementation which is faster than Python as it uses Just-in-Time compiler to translate Python code directly into machine-native assembly language. Jython is an implementation of the Python programming language that can run on the Java platform. Jython programs use Java classes instead of Python modules. Jython compiles into Java byte code, which can then be run by Java virtual machine. Jython enables the use of Java class library functions from the Python program.

Python code is first compiled by compiler to byte code which is later interpreted by Python virtual machine to the machine language. The .py source code is first compiled to byte code as .pyc. The byte-code are the instructions similar in spirit to CPU instructions, but instead of being executed by the CPU, they are executed by the Python Virtual Machine (PVM).

Statement, Indentation and Comments

In Python, the end of a statement is marked by a newline character. But we can make a statement extend over multiple lines with the line continuation character (\) as below.
a = 1 + 2 + 3 + \
    4 + 5 + 6 + \
    7 + 8 + 9
Line continuation is implied inside parentheses ( ), brackets [ ], and braces { }. We can also put multiple statements in a single line using semicolons, as follows:
a = 1; b = 2; c = 3
Most of the programming languages like C, C++, and Java use braces { } to define a block of code. Python, however, uses indentation. Indentation refers to the spaces at the beginning of a code line. A code block (body of a function, loop, etc.) starts with indentation and ends with the first unindented line. The amount of indentation is up to the developer, but it must be consistent throughout the block. Generally, four whitespaces are used for indentation and are preferred over tabs. PEP 8 is the documentation which has all the best practices for formatting the code.

In Python, the hash (#) symbol is used to start writing a comment which extends until the newline character. For multi-line comments which extend up to multiple lines, the triple quotes either ''' or """ is used as below.
# this is a python comment

"""
This is Documentation comment for python
"""

Data Types

Python supports Dynamic Typing of the variable were type depends on the value assigned to the variable. When a variable is assigned a value, actually it's a label pointing to the memory location with the value. If the variable is assigned to a new value, the type of the variable changes depending on the type of the value it's pointing to. Python is case sensitive language, hence uppercase variable is different from lowercase variable. Generally lower case is used for variable names, and "_" (underscore) is used to separate multiple words in variable or function name instead of camel case. 
x = 5          # type of variable x is integer
x = 'Example'  # type of variable x is now string
In Python every value is an object. A variable is a label pointing to the particular object (with memory location). When a variable is assigned a value 100, the label of the variable is pointing to the object containing value 100. If another variable is assigned same value 100, it will also point to the same object with 100. As more and more variable have the same value, the reference count to the object 100 increases. The reference count to the object decreases when the variables are re-assigned a different value, the variable goes out of scope or when del keyword is used to remove the variable (label) as a reference to the object. Once all the references to the object are removed, it can then be safely removed from the memory. Internally the python object holds the object type, its reference count and its value. If no variables is pointing to any given value or address location, then python makes it ready for garbage collection. Python uses both reference counting as well as generational garbage collection (variation of mark and sweep).

There is no concept of constant value in python. It depends on programmer to not change the value and treat it as a constant.


None: It represents no value assigned to variable. It is similar to null defined in other languages.

Numeric: It has 4 types namely: Int is integer, Float is floating point, Bool (True/False) and Complex. The boolean value of True (int(True) = 1) is 1 and boolean value for False is 0. Complex numbers have a real and imaginary part e.g. complex_number = 6 + 9j. Complex number can also be created using complex(b, k), were b is integer and k is floating point number.

Python has functions to create integer, boolean, float variables from string as below.
int_val = int("45")
float_val = float("6.78")
bool_val = bool("true")

Sequence types include List, Tuple, Set, String and Range which are discussed below. Apart from these python also has a Dictionary similar to a HashMap in Java.

Python provides the built-in type() function, which when passed one argument, returns the type of an object. It is used to get the type of the variable i.e. Integer, Float, String or Boolean.
type(var_name)

Standard Functions

Python has a set of built in functions.
The print() function is a standard function to print variables. It also takes expressions to print the results.
print('*' * 10)       # using expression within print function

By default the print function prints the text in a new line. To print the text in the same current line, we pass second argument end="" as below:
print('*' * 10, end="")

The input() function is used to get the user input in python.
field = input("Enter the value: ")

The eval() function is used to evaluate an expression or execute a function and return the corresponding result.
eval(input("Enter an expression: "))
# When entered the expression (2 + 6 - 1), it prints the result 7

Argument values "argv" is used to get arguments passed while running the python program.
import sys

x = int(sys.argv[1])
y = int(sys.argv[2])
z = x + y
print(z)
The id() function is used to get the address of the value pointed by the variable.
var_name = "Example"
id(var_name)
In python if multiple variables have the same data then all the variables will point to the same single address which contains the same data. In the below example the address pointed by a, b and 100 is the same, i.e. id(a) == id(b) == id(100). Further as we change the value of a to 200, the value of b remains the same i.e. 100, even if we stated (b = a) above.
a = 100
b = a
cond1 = (id(a) == id(b))        # returns true

print(a is b)                   # prints true, as both variable a and b point to same value or object

cond2 = (id(b) == id(100))      # returns true

a = 200
cond3 = (b == 100)              # returns true, even though we declared b=a and changed a to 200

String

Strings are amongst the most popular types in Python. We can create them simply by enclosing characters in quotes. Python treats single quotes the same as double quotes. Creating strings is as simple as assigning a value to a variable. Python support below special operators for string.

Operator Description Example
+ Concatenation - Adds values on either side of the operator a + b will give HelloPython
* Repetition - Creates new strings, concatenating multiple copies of the same string a*2 will give -HelloHello
[] Slice - Gives the character from the given index a[1] will give e
[ : ] Range Slice - Gives the characters from the given range a[1:4] will give ell
in Membership - Returns true if a character exists in the given string H in a will give 1
not in Membership - Returns true if a character does not exist in the given string M not in a will give 1
r/R Raw String - Suppresses actual meaning of Escape characters. The syntax for raw strings is exactly the same as for normal strings with the exception of the raw string operator, the letter "r," which precedes the quotation marks. The "r" can be lowercase (r) or uppercase (R) and must be placed immediately preceding the first quote mark. print r'\n' prints \n and print R'\n'prints \n
% Format - Performs String formatting print "My name is %s and weight is %d kg!" % ('Zara', 21)

str = "Python"

new_str = "I Like" + str

print( str[-1] )     # 1st character from the end

print( str[0:3] )    # Returns all chars from 0 till 3, not including the 3rd char

print( str[2:] )     # Returns all chars from 2 till (default) end of the string

print( str[:5] )     # Returns all chars from 0 (default) till 5 (excluding 5th char)

another = str[:]     # Returns all the characters from the string to create a clone of string

another = str[1:-1]  # Returns all chars from index 1 till 1st char from the end (excluding the last char)

# Trying to modify char in string throws error as strings are immutable.
str[0] = 'R'

# example of formatted string with prefix 'f' to use formatted strings
sentiment = 'good'
msg = f'{str} is a {sentiment} language'

# example of a identated string paragraph
para = '''
        used for paragraph. The text is printed with indentation as it is in the source code.
       '''
print(para)

Various String Methods 

The len() and print() are general purpose functions in python which work with other types as well. The rest of the below functions such as find(), replace(), upper() etc are string specific functions.
len(str) # returns the no of characters in the string.

str.isupper() # checks if string is in upper case

# Here upper() is a method, while len(), input() are general purpose functions. It creates a new string without modifying the existing string.
upper_str = str.upper()

# Returns index of the first occurrence of the character or string. It is case sensitive.
str.find('y')

paragraph = "I like programming in Python"
str.find('Python')  # returns index of the word python in the string paragraph.

str.replace('Python', 'Java')  # replaces the word with the passed word in the string
str.replace('P', 'J')          # replace a given character with another character

string.split(' ')      # returns a list of items (words)

To check if the string contains a given word or not, we use the 'in' operator which returns a boolean value, below is the example expression.
text = "Its fun to program in Python."
'Python' in text

The title() method returns a string where the first character in every word is upper case. Like a header, or a title. If the word contains a number or a symbol, the first letter after that will be converted to upper case.

Binary and Decimal Numbers

The bin() function converts decimal number to binary format. The '0b' prefix symbolizes that the number is in binary format.
bin(25) = 0b11001

For octal format we use oct() function  which returns result with prefix '0o'. Similarly for hexadecimal we use hex() function which returns the results with prefix '0x'.

Below are the bitwise operators in Python:
# compliment of number
~12 = -13

# bitwise and operator
12 & 13 = 12

# bitwise or operator
12 | 13 = 13

# bitwise ex-or operator
12 ^ 13 = 1

# bitwise left shift operator, which shift 2 bits to left
10 << 2 = 14

Arithmetic Operators

Python supports all the standard arithmetic operations (+,-, *). Although it has two types of division operators as below.
# Normal division which returns floating point number
10 / 3 = 3.33333333

# Whole division which return an integer result. 
10 // 3 = 3
Exponent operator
10 ** 3 = 1000  # means 10 to the power 3 
Augmented assignment operators
x += 3
x -= 3
Operator Precedence: Below is the order of precedence for operators in Python
  1. Parentithesis
  2. Exponentiation (12 ** 3)
  3. Multiplication or Division
  4. Addition or Subtraction
Python also allows assignment of multiple variables to different values.
a, b = 1, 2
It also allows to swap two variables as below: Python uses ROT_TWO() to swap the the two top most stack items for this operation.
a, b = b, a


Math Functions

Python support basic math operations by default as below.
round(2.9) = 2    # rounds a float value to integer
abs(-2.9) = 2.9   # returns positive representation of the value

It supports mathematical functions after importing the Math module.
import math

math.ceil(2.9) = 3   # Get ceiling of the number
math.floor(2.9) = 2  # Get floor of the number
math.sqrt(25)        # returns square root of the number
math.pow(3,2) = 9    # power function
math.pi              # value of PI

# import module and define module alias
import math as m
m.sqrt(25)
Random integer values can be generated using the random() function which also allows to specify the range for the random values.
import random

random.random()
random.randint(10, 20)
It also allows to select a random item from a list.
members = ["John", "Sam", "Michael", "Arthur", "George"]
random_member = random.choice(members)

If Else Statement
The if and else statements are used for conditional execution.
if a == true:
    print("Boolean value is true")
    print("Second line")
elif b == true:
    print("Another Boolean value is true")
else:
    print("Boolean value is false")

# if condition can also we written as a single line conditional assignment statement
fruit = "Apple"
is_apple = True if fruit == 'Apple' else False

Python support all basic comparison operators including <, >, <=, >=, ==, !=. It also provides following logical operators to combine multiple conditions.
  • and:   if a and b
  • or:    if a or b
  • not:   if a and not b

While Loop

The while statement is used for repeated execution as long as an expression is true.
i = 1
while i < 6:
  print(i)
  i += 1
While statements in Python can optionally also have an else block, which is executed only when the while loop completes successfully without any breaks. As the while loop can be terminated with a break statement, in which case the else part is ignored. Hence, a while loop's else part runs if no break occurs and the condition is false.
while counter < 3:
    print("Inside loop")
    counter = counter + 1
else:
    print("Inside else")

For Loop

For loop allows to iterate over the elements of a sequence (such as a string, tuple or list) or other iterable object.
for item in "Sample String":
   print(item)

for item in ["Toyota", "Honda", "Ferrari"]:
   print(item)
The for loop containing a condition in python has an else block which essentially means if nothing matched and no break occurred then execute the else block outside the for loop. The break condition is important here as without break, it will execute the else block every time.
for num in [12, 34, 23, 67]
   if num % 5 == 0:
       print(num)
       break
else:
   print("Not Found")
The range function creates objects based on the from/to parameters passed to it. Range object can also be converted to a list by passing it to list() function e.g. list(range(10)). Below is the example of range functions.
range(10)           # returns numbers from 0 to 9
range(5, 10)        # returns numbers from 5 to 9
range(5, 10, 2)     # returns numbers from 5 to 9 with steps of +2
range(20, 10, -1)   # returns numbers from 20 to 10 in descending order

# for loop can be used to loop through the values within the range
for item in range(10)
   print(item)
An underscore '_' can also be used as a variable in both for and while loops.
_ = 5
while _ < 10:
    print(_, end = ' ') # default value of 'end' id '\n' in python. we're changing it to space
    _ += 1

for _ in range(5):
    print(_)
Python support keywords, break, continue and pass. Break statement breaks the loop and continue skips the remaining code continuing with the loop. Pass keyword indicates that the block (can be a if/else block, loop block, class/method block) is empty and to skip it.

Arrays

Arrays is similar to a list were all the items are of same type. Arrays in python don't have specific fixed size. Arrays can be created using array(type, list of values) method. The type value is taken from python type code.
from array import *

vals = array('i', [5,9,8,4,2])   # type value 'i' indicates signed int
print(vals)
vals.buffer_info()  # returns a tuple (address, size), with address and size of the array.
vals.typecode       # returns i (signed integer)
vals.reverse()      # reverse the values of the array
vals.index(2)       # returns index of element 2 i.e. 4

# append() method is used to add values to the array.
vals.append(10)

empty_array = array('i', [])   # empty array of integers

newarray = array(vals.typecode, (a for a in vals))

for e in vals:
    print(e)

Lists

List can contain items of different types as opposed to an array.
names = ["John", "Bill", "Tony"]
names[-1]    # returns Tony
names[1:]    # returns a new list from 1st element (0th being the first) to the end of the list
names[1] = "Billy"    # update 2nd element

matrix = [ [1,2,3], [5,6,7], [3,7,8] ]

for row in matrix:
   for item in row:
      print(item)

numbers = [4,6,8,10]
numbers.append(56)     # adds item to the list
numbers.insert(index, item)
numbers.extends([16,37,68])   # add multiple elements to list
numbers.remove(item)
numbers.clear()
numbers.pop()      # remove last item
numbers.pop(index)     # remove indexed item
numbers.index(item)    # returns index of the first occurrence of the item
numbers.count(item)    # number of times the item occurs within the list
min(numbers)   # get minimum value in the list
sum(numbers)   # get sum of all items in the list
50 in numbers  # existence of an item within the list
50 not in numbers # 50 does not present in the list then true

numbers.sort()
numbers.reverse()  # reverses the list

numbers_copy = numbers.copy()  # create a copy of the list

List Comprehensions allows conditional construction of list literals using for and if clauses. They provide a more concise way to create lists.
print [i for i in range(10)]
# [0, 1, 2, 3, 4, 5, 6, 7, 8, 9]

print [i for i in range(20) if i%2 == 0]
# [0, 2, 4, 6, 8, 10, 12, 14, 16, 18]

Enumerate Function

The enumerate() function assigns an index to each item in an iterable object that can be used to reference the item later. The enumerate() function takes an iterable type object like a list, tuple, or a string, and an optional start parameter (0 by default) which tells which index to use for the first item of the iterable object. By default, the enumerate() function returns an enumerated object which can be converted to a tuple or a list by using tuple(<enumerate>) and list(<enumerate>), respectively.
cities = ['Amsterdam', 'New York', 'Paris', 'London']

for i, city in enumerate(cities)
    print(i, city)

The enumerate() function can be used instead of the for loop. That’s because enumerate() can iterate over the index of an item, as well as the item itself.
cars = ['kia', 'audi', 'bmw']
print(list(enumerate(cars, start = 1)))

Tuples

Tuples are same a list but unlike lists are immutable.
numbers = (1, 2, 3)
Tuples does not allow to change it items once assigned, as it does not support object assignment (hence they are immutable). It has only two methods (similar to lists) index() and count(). To read a specific item in the tuple use :
print(numbers[0])
When returning tuples from a function, we don't need to specify the brackets, e.g.
return a, b   # Python automatically interprets this as a tuple
Unpacking feature: Used to assign items of lists or tuples to variables by unpacking them.
coordinates = (1, 2, 3)
x = coordinates[0]
y = coordinates[1]
z = coordinates[2]

x, y, z = coordinates

list = (1, 2, 3)
a, b, c = list
If we don't want to use specific values while unpacking, just assign that value to special underscore '_' variable.
# ignoring a value
a, _, b = (1, 2, 3) # a = 1, b = 3

# ignoring multiple values
# *(variable) used to assign multiple value to a variable as list while unpacking
# it's called "Extended Unpacking", only available in Python 3.x
a, *_, b = (7, 6, 5, 4, 3, 2, 1)

Sets

Set does not retain the order of elements as it uses hash. Hence indexes are not supported in set. It does supports add(), remove(), pop() methods to update the set. Also there are no duplicates allowed in a set.
s = { 3, 4, 5, 7, 8, 18 }

Dictionary

Dictionary is of mapping data type. Dictionaries are used to store information as key value pairs. Every key is unique and should be immutable within a given dictionary.
customer = {
  "name": "John",
  "age": 67,
  "is_retired": False,,
  "cars": ["Honda", "Toyota"]
}

# returns value "John" associated with the "name" key in customer dictionary
# If specified key does not exits then it throws an error.
customer["name"]

# get() method also fetches the value of the key from the dictionary
# if the key is not present in dictionary then it returns None without throwing an error
customer.get("name")

# Also allows to specify default value which will be returned when no key exists within the dictionary 
customer.get("name", "default_value")   

customer["name"] = "Jack"   # updates the value of the key "name" in the dictionary
customer["birth_date"] = "10 Jan 1980"   # Adds new key-value to the dictionary
customer.clear()   # empty the dictionary
customer.keys()  # returns all keys in the dictionary
customer.values()  # returns all values in the dictionary

The del keyword is used to delete objects. In Python everything is an object, so the del keyword can also be used to delete variables, lists, or parts of a list etc.
del customer["birth_date"]

Zip Function

The zip() function creates an iterator of tuples which aggregate elements from two or more iterables. It pairs the first item in each passed iterator together, followed by paring the the second item in each passed iterator together and so forth.
keys = ["Texas", "Ohio", "California"]
values = ["Austin", "Columbus", "Sacramento"]
capitals_dictionary = dict(zip(keys, values))   # zip converts two lists in key-value pairs

names = ("Tony", "Jack", "Tom", "Merlyn")
companies = ("Google", "Apple", "Facebook", "Microsoft")
zipped = zip(names, companies)

print(list(zipped))   # return each element from two list as pairs in as new list
[ ('Tony', 'Google'), ('Jack', 'Apple'), ('Tom', 'Facebook'), ('Merlyn','Microsoft') ]

for (a,b) in zipped:
    print(a,b)
The zip function also allows to iterate through multiple lists in parallel and access the corresponding element.
x_coordinates = [34, 56, 67, 89]
y_coordinates = [78, 76, 43, 12]

for x, y in zip(x_coordinates, y_coordinates):
    print(x, y)

Functions

Functions are always defined first and then called in Python. It is recommended to have 2 blank lines after the function definition. The immutable arguments (int, string) passed to the function are passed by value, while mutable values (list, set etc) are passed by reference in python.
      def greet_user(first_name, last_name, location):
            print(f"Hello {first_name} {last_name} ! How is it in {location}")

The actual arguments which are actually passed to the function have below types.

Positional Argument: Positional Parameters are passed in the order of their definition in the function.
      greet_user("John", "Smith", "Canada")

Keyword Argument: Keyword arguments are passed by keyword or name of argument in any order. The positional arguments and keyword arguments can be mixed within the function call. But keyword arguments should always come after positional arguments.
      greet_user(location="London", last_name="Mayer", first_name="John")

      greet_user("John", location="London", last_name="Mayer")

Default Argument: Set default value to the arguments of the functions so that those values can be skipped while calling the function.
     def greet_user(first_name, last_name, location='USA'):
           print(f"Hello {first_name} {last_name} ! How is it in {location}")

      greet_user("John", "Smith")

Variable Length Argument: The number of arguments passed in a function is not fixed for variable length arguments. A '*' is added before the argument name in function definition. The variable length argument is of type tuple in the function.

     def sum(*a):
       r = 0

       for i in a:
           r += i

     sum(4, 7, 9, 2)

Keyword variable length arguments is same as Variable length arguments, but it allows keyword arguments to be included in variable length. It is indicated by adding '**' before the argument name.

     def person(name, **keyword_args):
         print(name)
         
         for i, j in keyword_args.items():
             print(i, j)

     person('Jack', age=56, city='London', contact=441711231233)

If there is no return statement in a function, then by default all the functions in python return None. A function returning None in Python is similar to void return in Java. Function can return multiple values instead of a single value as below.
      def count(l):

         odd, even = 0, 0

         for i in l:
            if i%2 == 0:
               even += 1
            else:
               odd += 1
          
         return odd, even

      lst = [3,5,7,8]
      even, odd = count(lst)  

Python allows maximum recursion depth of 1000. The sys.getrecursionlimit() function returns this recursion limit of python. The sys.setrecursionlimit(9999) allows to override the default value and set a custom recursion limit.

First-class functions

In Python, functions are first-class objects. This means that functions can be passed around and used as arguments, just like any other object. Also functions can be returned as values.
def say_hello(name):
    return f"Hello {name}"

def be_awesome(name):
    return f"Yo {name}, together we are the awesomest!"

def greet_bob(greeter_func):
    return greeter_func("Bob")

greet_bob(say_hello)
greet_bob(be_awesome)

Inner Functions

Python allows to define a functions inside other functions. Such functions are called inner functions with below example. The inner functions are not defined until the parent function is called. They are locally scoped and only exist inside the parent() function.
def parent():
    print("Parent function")

    def first_child():
        print("first child function")

    def second_child():
        print("second child function")

    second_child()
    first_child()

Function Annotations

Function annotations is a Python 3 feature that allows to add arbitrary metadata to function arguments and return value. The annotations only provides a nice syntactic support for associating metadata without any semantics (meaning) and is totally optional. In the below example function sum() which takes 3 arguments, a, b and c. The first argument a is not annotated, the second argument b is annotated with the string ‘annotating b’, and the third argument c is annotated with type int. The return value is annotated with the type float. Note the "->" syntax for annotating the return value. The annotations have no impact whatsoever on the execution of the function. Annotations have no standard meaning or semantics and is mainly used for documentation.
def sum(a, b: 'annotating b', c: int) -> float:
    print(a + b + c)

Modules

A module is a python file which contains all the related functions and classes. The module can be imported into another python file in order to execute functions. The "import module-name" statement imports entire module in the python file. It also requires to specify the "module-name.function()" to call the function. 

In the below example we have the Calc.py file which has add() function. Then another demo.py file is trying to call the add() function from Calc.py.
import Calc

a = 4
b = 7
c = Calc.add(a, b)

In order to import only selected functions in python module we use "from module-name import function". It allows to call the function() directly without using the prefix 'modulename.'.
from math import sort, pow
pow(3,2)

All the related modules are organized into a package which is a directory containing module files. Package is the container for multiple modules. A special file called "__init__.py" is added to the package directory to make the directory a package. When the python interpreter sees the "__init__.py" file in a directory then it treats the directory as a package. The modules within the package can be imported using "import package-name.module-name" or "from package-name.module-name import function".

Python has many standard built-in modules for many general functionality. The complete list is available in python 3 module index documentation. These modules can be imported directly without specifying the package name. The built in modules are located in python 3.x directory (library root) within the base python directory.

__name__ global variable

In Python Introspection is the ability of an object to know about its own attributes at runtime. For instance, a function knows its own name and documentation. The __name__ is once such a special global variable in python whose value depends on the place it is fetched. The value of __name__ is __main__ in the file were the python code is being executed. On other hand, its value is module name when its printed in another module imported in the main execution file. The value of the __name__ variable changes as per the place its being used. When running the python file as a main code, and using __name__ then it returns __main__. When __name__ is fetched in a file imported as a module then it returns module name.  When a module is imported in python, it executes all the statements in the file. To avoid executing main method in the module file when imported as a module, but to allow execution of main method when ran in standalone mode, the __name__ variable is checked for __main__ as below.
def main():
   print("Hello")

if __name__ == "__main__"
    main()

Global Keyword

Global variables defined outside the function are accessible to the function in python. If the name of global variable and local variable in the function is same, then local variable will always take precedence within the function. If a global variable is assigned a value within a function it is interpreted as local variable. Hence to modify a global variable from within the function, a global keyword is used before the global variable name to explicitly specify access to global variable.
       a = 90

       def test():
          global a
          a = 34
          print("value of a is ", a) 

       test()
       print("Outside test value of a is ", a)
Also globals() provides access to all the global variables. To access a particular global variable 'a', we use globals()['a'].
       a = 10

       def test():
          globals()['a'] = 15

Lambda Functions

Functions are objects in Python and they can be passed as parameters into other functions.
function = lambda parameters: body
f = lambda a,b : a+b

numbers	= [2,3,7,9,6,4,5,8]

# filter() example

even_nums = list(filter(lambda n: n%2 == 0, numbers))

# map() example

squares = list(map(lambda n: n*n, numbers))

# reduce() example 

from functools import reduce

sum = reduce(lambda alb: a+b, numbers)

Iterators

The for loop uses iterators behind the scenes for looping items. The iter() is the function which converts a list to an iterator, which is used to iterate the list one value at a time. The iterator has __next__() method which gives the current value and points to the next value. The iterator preserves the state of the last value returned by it.
numbers = [ 2, 15, 8, 6, 3, 4]

iterator = iter(numbers)

# Both below method prints the current value in the iterator and points to the next value
print(iterator.__next__())
print(next(iterator))

Example of iterator in a while loop.

def loop(iterable):
    oIter = iterable.__iter__()
    while True:
        try:
            print oIter.next()
        except StopIteration:
            break

loop([1,2,3])
A custom iterator can be created by implementing the __next__() and __iter__() methods.
class NumGenerator

     def __init__(self, start, limit):
	 self.num = start
         self.limit = limit

     def __iter__():
         return self

     def __next__():

         if self.num <= self.limit:
             val = self.num
             self.num += 1
             return val
         else:
             raise StopIteration


generator = NumGenerator(1, 50)

for i in generator
     print(i)

Generator

Generators are iterators, a kind of iterable we can only iterate over once. Generators do not store all the values in memory, they generate the values on the fly. The yield keyword is used to produce a sequence of values. It is used to iterate over a sequence without storing the entire sequence in memory. If the body of a def contains yield, the function automatically becomes a generator function.
def numgenerator()
    yield 1
    yield 2
    yield 3
    yield 4
    yield 5

gen = numgenerator()
print(gen.__next__())

# Below  for loop prints 2 to 5, as 1 is printed by above print statement
for i in gen
    print(i)


Exceptions

In python, Exception is a generic error which includes all errors/exceptions. The try statement specifies exception handlers and/or cleanup code for a group of statements as below.
try:
     age = int(input('Age: '))
	 income = 20000
	 average = income / age
	 print(f"Age is {age}")
except ZeroDivisionError:
     print('Age cannot be zero')
except ValueError:
     print('Invalid value')
except Exception as e:
   print("Something went wrong...", e)
finally:
   print("execution completed")
The try statement also supports else block after the except block, which is executed when there is no exception.
value = '9X'

try:
    print(int(value))
except:
    print('Conversion failed !')
else:
    print('Conversion successful !')

With Statement

The with statement wraps the execution of a block with methods defined by a context manager. This allows common try…except…finally usage patterns to be encapsulated for convenient reuse. In the below example, the with statement automatically closes the file after the nested block of code, no matter how the block exits. If an exception occurs before the end of the block, it will close the file before the exception is caught by an outer exception handler. If the nested block were to contain a return statement, or a continue or break statement, the with statement would automatically close the file in those cases as well.
with open('output.txt', 'w') as f:
    f.write('Hi there!')

Classes

Everything in Python is an Object. Classes are used to define new type or objects. The class can have methods in its body and they can also have attributes which can be set anywhere in the program. 
# In Python we use camel case naming to name the class
class Point:
    def draw(self):
		print("draw")

point1 = Point()
point1.x = 10    # Creates an attribute x in point1 object and assigns the value 10

class Person:

    country = "USA"

	def __init__(self, name, age):
		self.name = name   # self is reference to current object. It adds new attribute 'name' and assigns the parameter value
		self.age = age
		
	def greeting(self):
		print(f"hello, {self.name}")
		
	def compare(self, other):
		if self.age == other.age:
			return true
		else:
			return false		
		
employee = Person("John", 90)

# Two ways to call greeting() method
Person.greeting(employee)

# Here the object on which the method is called, internally passes itself as an agrument to self.
employee.greeting()

# Update the attribute of the object externally
employee.name = "Tim"
employee.greeting()

manager = Person("Michael", 90)

# Compare takes two parameters, who is calling it and whom to compare with.
if manager.compare(employee):
	print("Employee and Manager have same age")

# class variables are accessed same as instance variables.
print(manager.name, manager.age, manager.country)

# update class variable
Person.country = "Canada"

Init and New Methods

In Python, __init__() method is responsible for instantiating the class instance. It acts as the constructor of the class and takes parameters to set attribute values. The __init__() constructor is optional for a class. The __new__ method is similar to the __init__ method, and is called when the class is ready to instantiate itself. The major difference between these two methods is that __new__ handles object creation and __init__ handles object initialization. The __new__() method is defined as a static method in the base class and it needs to pass a class (cls) parameter. The class (cls) parameter represents the class that needs to be instantiated, and this parameter is provided automatically by python parser at instantiation time. The __new__ method is called first when an object is created and __init__ method is later called to initialize the object. If both __init__ method and __new__ method exists in the class, then the __new__ method is executed first and decides whether to use __init__ method or not. The reason being that the new() method can call other class constructors or simply return other objects as instances of this class.  

The self parameter represents the current (object) instance of the class. The self keyword allows to access the attributes and methods of the class in the python. It binds the attributes with the given arguments.
class Employee(object):
   
     def __init__(self, name, salary):
         self.name = name
         self.salary = salary
      
     def __new__(cls, name, salary):
         if 0 < salary < 10000:
             return object.__new__(cls)
         else:
             return None
   
     def __str__(self):
         return '{0}({1})'.format(self.__class__.__name__, self.__dict__)
         
     emp = Employee("James", 4500)
     print(emp)


Two types of variables in Python class, an instance variable and a class (static) variable which is common for all the objects. The variables defined within __init__() are instance variables, while the variables defined outside __init__() in the class are called class variables. Python has namespace which is an area where an object/variable is created and stored. Class variables are stored in class namespace, while instance variables are stored in Object/instance namespace.

There are two types of methods in Python:

Instance methods: The methods which take the "self" parameter are called instance methods. Instance methods have two types, accessor methods which fetch values and mutator methods which modify values.

Class methods: Class methods are common to all objects and are used to work with class variables. All class methods have the parameter "cls" in their methods.

class Person:

    country = "USA"

    @classmethod
    def country(cls):
         return cls.country


p1 = Person()
print(p1.country())

print(Person.country())

To call the class method we need to pass cls parameter which can be avoided by adding @classmethod decorator to the class method.

Static methods: The method which neither uses the instance variables nor class variables and provides independent functionality is called a static method. Mainly it is used for utility methods. For static method we need to use the @staticmethod decorator.

class Person:

    def info():
	print("Information about the class Person")

Person.info()

Meta-Classes

In Python the object.__class__ designates the name of the class for the object. From Python 3 an object’s type and its class is referred interchangeably, as type(object) is the same as object.__class__. Since everything is an object in Python, all the classes also have a type, which is the type class itself. The type class is a metaclass, of which all the classes are instances. 

The built-in type() function enables to create new class dynamically. It takes the name of the class, tuple of base classes which the class inherits and namespace dictionary containing the definitions for class body. When all these parameters are passed the type() function dynamically defines a class.
# create new class Person dynamically. Here attr_val can also be assigned to an external function name
Person = type('Person', (), { 'attr': 100, 'attr_val': lambda x : x.attr })

p = Person()
print(p.attr_val())            # prints value 100 of attr

# create new class Employee extending Person class dynamically
Employee = type('Employee', (Person,), dict(attr=100))

e = Employee()
print(e.attr)                  # prints 100
print(e.__class__)             # prints class '__main__.Employee'
print(e.__class__.__bases__)   # prints tuple with single element, class '__main__.Person'

A class in Python can be instantiated using the expression e.g. Person() which creates a new instance of class Person. When the interpreter encounters Person(), it first calls the __call__() method of Person’s parent class. Since Person is a standard new-style class, its parent class is the type metaclass, so type’s __call__() method is invoked. This __call__() method in turn invokes the __new__() and __init__() methods. If Person does not define __new__() and __init__(), default methods are inherited from Person’s ancestry. But if Person does define these methods, they override those from the ancestry, which allows for customized behavior when instantiating Person.
def new(cls):
     x = object.__new__(cls)
     x.attr = 500
     return x

# modify instantiation behavior of class Person by initializing an attribute attr to 500
Person.__new__ = new

g = Person()
print(g.attr)               # prints 500
Python does not allow to reassign the __new__() method of the type metaclass. To customize the instantiation of the class, a custom meta class can be created by extending the type meta class and overriding the __new__() method. While defining a new class we specify that its metaclass is a custom metaclass using the metaclass keyword in the class definition, rather than the standard metaclass type. Such custom meta-class serve as a template for creating classes and referred to as class factories.
class Meta(type):
     def __new__(cls, name, bases, dct):
         x = super().__new__(cls, name, bases, dct)
         x.attr = 100
         return x
         
     def __init__(cls, name, bases, dct):
         cls.attr = 100

class Foo(metaclass=Meta):
     pass

print(Foo.attr)

Inner Classes

Python also allows to have inner classes as shown in below example. We can create object of inner class inside the outer class or outside the outer class provided the outer class name is used to call it.
class Person:

	def __init__(self, name, age):
		self.name = name
		self.age = age
                self.address = self.Address()

        def show(self):
             print(self.name, self.age)
             self.address.show()

        class Address:

      	      def __init__(self):
            	  self.street = "Main Street"
              	  self.city = "Boston"
            	  self.country = "USA"

              def show(self):
               	  print(self.street, self.city, self.country)
  

p1 = Person("Jimmy", 2)
p1.show()

# access attributes of inner class
print(p1.address.street)

new_address = Person.Address()

Inheritance

Python allows to inherit all the methods from the parent class. It also allows multiple inheritance. Every class in Python is derived from the object class which is the base type in Python.
class Mammal:
	def __init__(self):
              print("Mammal Init")


	def breathe(self):
		print("breathe oxygen")

class Fish:
	def __init__(self):
              print("Fish Init")

	def swim(self):
		print("swims")


# Python does not like empty class, so a 'pass' line is added to let python know to pass this line. 
class Dog(Mammal):
        pass

class Cat(Mammal)
	def __init__(self):
              super().__init__()
              print("Cat Init")

        def runs(self):
              print("runs 30mph")


class Whale(Mammal,Fish)

	def __init__(self):
              super().__init__()  # By default calls the Mammal's init method
              print("Cat Init")

        def color(self):
              print("color of whale is blue") 

Python always executes the __init__() method of the object's class. If it cannot find the __init__() method in the sub class then it will call the init method of the super class. To call explicitly call init() method of the super class from subclass or any other methods in super class, the super() keyword is used. As python supports multiple inheritance, when a sub class inheriting from multiple super classes calls super().__init__() method from its own __init__() method then by default it calls the init method of the first Super class mentioned in the inheritance list. Python has a Method resolution order which starts from left to right of the super classes in multiple inheritance. Hence the first super class mentioned in the multiple inheritance is called for init() or any other method using super().method_name().


Method Resolution Order

Method Resolution Order (MRO) determines the order in which base class methods should be inherited in the case of multiple inheritance. It defines the order in which the base classes are searched when executing a method. First the specified method or attribute is searched within the current class. If not found, the search continues into parent classes in depth-first, left-right fashion, in the order specified while inheriting the classes, without searching the same class twice. MRO ensures that a class always appears before its parents. In case of multiple parents, the order is the same as tuples of base classes. In the below example of diamond inheritance Python follows a depth-first lookup order i.e. Class D -> Class B -> Class C -> Class A, which ends up calling the method from class B.
class A: 
    def hello(self): 
        print(" In class A") 
class B(A): 
    def hello(self): 
        print(" In class B") 
class C(A): 
    def hello(self): 
        print("In class C") 
  
# multiple inheritence
class D(B, C): 
    pass
     
r = D() 
r.hello()
MRO of a class can be viewed as the __mro__ attribute or the mro() method. The former returns a tuple while the latter returns a list.
class X:
    pass

class Y:
    pass

class Z:
    pass

class A(X, Y):
    pass

class B(Y, Z):
    pass

class M(B, A, Z):
    pass

print(M.mro())

Polymorphism

Duck Typing

class PyCharm

   def execute(self)
        print("Compiling")
        print("Running")

class Sublime

   def execute(self)
        print("Spell Check")
        print("Compiling")
        print("Running")

class Computer

   # Here ide variable takes any type as long as it has the execute() method
   def code(self, ide)
        ide.execute()

comp = Computer()

pycharm = PyCharm()
comp.code(pycharm)

sublime = Sublime()
comp.code(sublime)

Operator Overloading

class Business

	def __init__(self, expense, sales):
             self.expense = expense
             self.sales = sales

        def __add__(self, other):
             expense = self.expense + other.expense
             sales = self.sales + other.sales
             business_obj = Business(expense, sales)
             return business_obj

        def __str__(self):
             return '{} {}'.format(self.sales, self.expense)

b1 = Business(1300, 2100)
b2 = Business(9800, 7300)

# Python internally converts the + operator expression to method call Business.__add__(b1, b2)
b3 = b1 + b2
Similar as the '+' is converted to predefined __add__() method call, other operators are converted to python methods as mentioned . Also python invokes __str__() method behind the scene when we try to print the value of any object.
# Internally python calls print(b1.__str__())
print(b1)  

Method Overloading: Python does not support method overloading were we can have two methods with same name but different (no of) arguments. But python does allow to set default values to method parameters making them optional while invoking the method as below.

class Sample

        def sum(self, a=None, b=None, c=None):

             s = 0

             if a != None and b != None and c != None:
                 s = a + b + c
             elif a != None and b != None:
                 s = a + b
             else:
                 s = a

             return s
	
s1 = Sample()
print(s1.sum(4,7,9))
print(s1.sum(2,7))

Method Overriding: Python supports Method Overriding, and invokes the method in the current class rather than the super class method with same name.

class A
    def show(self)
       print("In Class A")

class B(A)
    def show(self)
       print("In Class B")

b1 = B()
b1.show()

Abstract Class

By default python does not support abstract classes. The ABC (Abstract Base Classes) module is used to implement abstract class in python.
from abc import ABC, abstractmethod

class Computer(ABC):     # The abstract class with abstract methods should inherit from class ABC

    @abstractmethod      # Abstract methods are annotated with abstractmethod annotation
    def process(self):
        pass

class Laptop(Computer):

    def process(self):
        print("Running")


com = Computer()
com.process()      # Gives error as process() is abstract method in Computer class

lap = Laptop()
lap.process()

Decorators

Decorators allow to add extra features to the existing functions without modifying the actual function. In other words the behavior of the existing function is changed using decorator by adding a new function which invokes the original function. It modifies the behavior of a function without permanently modifying it, by wrapping the original function with another function. Python allows to pass a function as a parameter to another function.
def msg_decorator(function):
    def wrapper():
        print("Hello")
        function()
        print("Welcome to Python Tutorial !")
    return wrapper

def say_whee():
    print("Whee !")       

say_whee = msg_decorator(say_whee)
say_whee()

Python allows to use decorators in a simpler way using the @ symbol. In the below modified say_whee() method, we use @msg_decorator which is just an easier way of saying say_whee = msg_decorator(say_whee).
@msg_decorator
def say_whee():
    print("Whee !")  
The *args and **kwargs are used in the inner wrapper function to support it to accept an arbitrary number of positional and keyword arguments. Similarly the wrapper function should support return value if the decorated function to return values from decorated functions. Further the name of the original function (using .__name__) after being decorated could be fixed by using the @functools.wraps decorator.
import functools

def decorator(func):
    @functools.wraps(func)
    def wrapper_decorator(*args, **kwargs):
        # Do something before
        value = func(*args, **kwargs)
        # Do something after
        return value
    return wrapper_decorator

Decorating Classes

The methods of a class can be decorated similar as the functions. Some commonly used decorators that are built into Python are @classmethod, @staticmethod, and @property. The @classmethod and @staticmethod decorators are used to define methods inside a class namespace that’s not connected to a particular instance of that class. The @property decorator is used to customize getters and setters for class attributes.
class Circle:
    def __init__(self, radius):
        self._radius = radius

    @property
    def radius(self):
        return self._radius

    # define a setter method
    @radius.setter
    def radius(self, value):
        if value >= 0:
            self._radius = value
        else:
            raise ValueError("Radius must be positive")

    @property
    def area(self):
        return self.pi() * self.radius**2

    def cylinder_volume(self, height):
        return self.area * height

    @classmethod
    def unit_circle(cls):
        return cls(1)

    @staticmethod
    def pi():
        return 3.1415926535

Decorators can be used on the entire class as a simpler alternative to metaclasses. The only difference is that the decorator will receive a class and not a function as an argument. The decorator class takes a function as an argument in its .__init__() method and stores a reference to the function. The class instance is also callable, by implementing the special .__call__() method, so that it can stand in for the decorated function. The .__call__() method will be called instead of the decorated function. The functools.update_wrapper() function is used instead of @functools.wraps.
class CountCalls:
    def __init__(self, func):
        functools.update_wrapper(self, func)
        self.func = func
        self.num_calls = 0

    def __call__(self, *args, **kwargs):
        self.num_calls += 1
        print(f"Call {self.num_calls} of {self.func.__name__!r}")
        return self.func(*args, **kwargs)

@CountCalls
def say_whee():
    print("Whee!")

File Handling

Files can be access in python using open() function. It could be opened in read (r), write (w) or append (a) mode using character format by default.
file = open("file.txt", a)
if file.readable():
     print(file.read())      # read entire file
     print(file.readline())  # read single line
     file.write("something")

file.close()
There are additional modes named read (rb), write (wb) or append (ab) to access/write binary files. Refer to the complete list of file access modes for details. Below example copies image data from one file to another file.
f1 = open('image1.jpg', 'rb')
f2 = open('image2.jpg', 'wb')

     for data in f1:
         f2.write(data)


# The glob() method allows to search for files or directories in the current path.
for file in path.glob('*.py')
	print(file)
Pathlib module provides an object oreinted filesystem paths, i.e. it provides classes to work with files and directories.
path = Path("tempdirectory")
path.exists()
path.mkdir()
path.rmdir()

Multi Threading

from time import sleep
from threading import *

class Greeting(Thread):

       # run() is a method in Thread class which needs to be overridden to implement thread.
       def run(self):
            for i in range(500)
                 print("Hello")
                 sleep(1)        # sleep takes number of seconds for the execution to be suspended


class Message(Thread):

       def run(self):
            for i in range(500)
                 print("Welcome")
                 sleep(1)


g = Greeting()
m = Message()

# The start() method of Thread class internally invokes the run() method
g.start()
m.start()

# Ask main thread to wait until thread m and thread g completes
g.join()
m.join()

print("Thread program completed")

PIP and PyPI

Pip is the standard package environment system to install and manage software package in Python. It allows you to install and manage additional packages that are not part of the Python standard library. Pip has been included with the Python installer since versions 3.4 for Python 3, as package management is important for application development.

Python has a very active community that contributes an even bigger set of packages than the Python standard library, which helps with our development needs. These packages are published to the Python Package Index, also known as PyPI. PyPI hosts an extensive collection of packages that include development frameworks, tools, and libraries. For example PyPI hosts a very popular library to perform HTTP requests called requests. To install any package, the command "pip install <package>" is used. Pip then looks for the package in PyPI, calculates its dependencies, and finally installs the package. The package is installed in python 3 directory under site packages folder. The pip install command always installs the latest published version of a package.

$ pip install requests

The list command shows the packages installed in the environment.
$ pip list

To view the package metadata the show command in pip is used.
$ pip show requests

To Install the specific version of a package we use.
$ pip install "SomeProject==1.4"

To install greater than or equal to one version and less than another:
$ pip install "SomeProject>=1,<2"

To install a version that’s “compatible” with a certain version: 4
$ pip install "SomeProject~=1.4.2"

To upgrade an already installed package to the latest from PyPI.
$ pip install --upgrade SomeProject

The --upgrade option upgrades all specified packages to the newest available version. The --force-reinstall option reinstalls all packages even if they are already up-to-date. The --ignore-installed option ignores whether the package and its deps are already installed, overwriting installed files. The --no-deps option doesn't install package dependencies.

$ pip install --upgrade --force-reinstall --ignore-installed --no-deps <package>

We can create a specification of the dependencies and versions which would be used to develop and test the application. Requirement files allow to specify exactly which packages and versions should be installed. The pip freeze command outputs all the packages installed and their versions to the standard output. This output from freeze command in requirements format can be redirected to generate a requirements file.

$ pip freeze > requirements.txt

The requirement.txt would contain out in below format.
scikit-learn==0.22.1
matplotlib==3.1.3
numpy==1.11.2
To later replicate the environment in another system, we can run pip install specifying the requirements file (or any other text file name) using the -r switch as below.
$ pip install -r requirements.txt

Pip search command allows to search in the PyPI for any libraries using multiple search keywords.
$ pip search requests oauth

Package can be uninstalled using the uninstall command.
$ pip uninstall request

Pip by default gets the latest version of python packages, including the sub-dependencies which could cause issues especially in production if the version is non-backward compatible. Typically this is resolved by executing the 'pip freeze' command which pins all dependencies and freezes everything in development to requirement.txt file. Although now each specified versions of third-party packages including its sub-dependencies needs to be manually updated ensuring inter compatibility, which can become cumbersome to manage.

Virtual Environment

Virtual environment is an indispensable part of Python programming. A virtual environment is an isolated container containing all the software dependencies for a given project. It has its own Python executable and third-party package storage. It is important because by default software (packages) such as Python, NumPy and Django are installed in the same directory. Python stores all the system packages in a child directory of the path from "sys.prefix" and all the third party packages are placed in one of the directories pointed by "site.getsitepackages()". This causes a problem when we want to work on multiple projects on the same computer. If a project uses one version of NumPy while some other project uses a different NumPy version, then the virtual environment provides an isolated environment to separate the two project setups effectively. There are no limits to the number of virtual environments we can have since they’re just directories containing a few scripts. The venv module which is part of standard library in Python 3 enables to create the lightweight virtual environments mentioned before.

The virtualenv tool can be installed with pip using the below command.
$ pip install virtualenv

Create a new virtual environment inside a new directory 'virtual-env'. The below command works only for Python 3.
$ mkdir virtual-env && cd virtual-env
$ python3 -m venv envname

Alternatively we can use the below command to create and start virtual environment named 'envname', using the default python version. It creates the virtual environment within the current directory.
$ virtualenv envname

Create and start virtual environment using the specified python version. 
$ virtualenv envname -p python3
$ virtualenv envname -p /usr/local/bin/python3

The above command creates a env directory which contains bin directory with all python binaries, include directory with python packages and finally the lib directory were all third party dependencies are installed in site-packages. The activate scripts in the bin directory allow to to set up the shell to use the environment’s Python executable and its site-packages by default. In order to use this environment's packages/resources in isolation, we need to “activate” it using the below command.

$ source envname/bin/activate

For windows the command is '.\Scripts\activate'. With the above command the prompt is prefixed with the name of the environment (envname) indicating that the 'envname' environment is active. To exit from the environment use the deactivate command.
(envname) $ deactivate

On activation of the environment, the virtual environment’s bin directory is the first directory searched when running an executable on the command line. Thus, the shell uses our virtual environment’s instance of Python instead of the system-wide version.

The virtualenvwrapper tool is a wrapper scripts around the main virtualenv tool, which helps in organizing all the virtual environments in one location. It also provides methods to easily create, delete, and copy environments, and switch between multiple environments.


Pipenv

Pipenv is a packaging tool which simplifies the dependency management in Python-based projects. It brings together Pip, Pipfile and Virtualenv to provide a straightforward and powerful command line tool. Pipenv has virtual environment management built in which makes it a single tool for both package and environment management. The virtual environment for the project is created and managed by Pipenv when packages are installed via Pipenv’s command-line interface. Dependencies are tracked and locked, with development and production dependencies managed separately. Pipenv is installed using below pip command

pip install pipenv

The pipenv install command is used to install (all or specific) packages within the project. It also creates two files, Pipfile and Pipfile.lock, and a new virtual environment in the project directory. If no python version is specified, it uses the default version of Python. The Pipfile contains dependency information about the project and is used to track the project dependencies. The Pipfile supercedes the requirements.txt file that is typically used in Python projects. The pipenv install command installs all the packages specified within the Pipfile.

pipenv install

Specific package can be installed or removed using the pipenv's install and uninstall commands as below
pipenv install requests
$ pipenv uninstall requests

Pipenv enables to keep two environments separate using the --dev flag and install pytest in dev environment.
$ pipenv install pytest --dev

To completely wipe all the installed packages from your virtual environment, we use below command.
$ pipenv uninstall --all

The package name along with its version and its dependencies, can be frozen by updating the Pipfile.lock. This is done using the below lock command.
$ pipenv lock

In order to activate or create the virtual environment associated with the Python project below shell command for pipenv is used.
$ pipenv shell

To invoke shell commands in the virtual environment, without explicitly activating it first, the run command is used.
$ pipenv run <insert command here>

Pipenv's graph command displays a dependency graph to understand the top-level dependencies and their sub-dependencies.
$ pipenv graph

Pipenv supports the automatic loading of environmental variables when a .env file (containing key-value pairs) exists in the top-level directory. In such case, when the pipenv shell command opens the virtual environment, it loads the environmental variables from the file. The default behavior of Pipenv can be changed using some environmental variables for configuration.

Pipenv has many advance features such as specifying a package index, detection of security vulnerabilities, easily handling environment variables, and playing nicely with Windows. Some of the drawbacks of pipenv include, generation of many miscellaneous files in the project root directory, performance issues with dependency resolution and has complex commands/options. Also pipenv does not manage the scaffolding (internal structure) of the project unlike Poetry.


Poetry

Poetry is a modern tool which simplifies dependency management and packaging in Python. It manages project dependencies, creation and activation of virtualenv, build and publishing of packages, ensures package integrity and allows to convert python functions to command line programs. It also provides directory structure for the project including tests.

Install poetry using below pip command
$ pip install poetry

Below are some of the poetry commands to setup project, fetch dependencies and execute project.

It is recommended to configure poetry to create the project's virtual environment in .venv folder inside the project directory, before using poetry to create a project. This is very handy when using IDEs like VS Code and PyCharm as they immediately recognizes the .venv folder and pick up the correct interpreter.
$ poetry config virtualenvs.in-project true

Create a new project by creating a directory structure for the project.
$ poetry new poetry-demo

The above command creates the project's directory structure containing poet and test directories, and the pyproject.toml file. The .toml file defines the project metadata, all project build dependencies, development dependencies to perfom other actions like testing, building, documentation, etc and finally the build system. Poetry also automatically creates the virtual environment for the project, if it detects no virtual environment already associated with the project. The environment info command in poetry displays the path of the current virtual environment with other details.
$ poetry env info

The poetry init command creates a pyproject.toml file interactively by prompting to provide basic information about the package.
$ poetry init

The install command reads the pyproject.toml file from the current project, resolves all the dependencies, and installs them.
$ poetry install

During the installation, poetry automatically generates the poetry.lock file to track the exact version of the dependencies that have been install on the system. If the poetry.lock file is already present, it would install the exact version of packages defined in the lock file, instead of trying to install the latest one from PyPi. It is recommended to track poetry.lock along with pyproject.toml file in source control.

In order to get the latest versions of the dependencies and to update the poetry.lock file, you should use the update command
$ poetry update

The add command adds required packages to your pyproject.toml and installs them. The --dev flag is used to install a development dependency which is not directly related to the project.
$ poetry add pandas
$ poetry add flake8 --dev

The lock command locks (without installing) the dependencies specified in pyproject.toml.
$ poetry lock

The show command lists all of the available packages. The -t or --tree option lists all the dependencies as well as the sub-dependencies in tree format. The --latest option allows to check if there is any latest version available for the package dependency.
$ poetry show
$ poetry show --tree
$ poetry show --latest

The run command executes the given command inside the project's virtual environment. It can also execute one of the scripts defined in pyproject.toml.
poetry run pytest
poetry run python main.py

Poetry also provides a shell command that spawns a new shell directly inside the virtual environment. It enables to execute commands in virtual environment without using 'poetry run' in front of the command.
$ poetry shell
> pytest

The update command can be used to update all or specific package dependencies.
$ poetry update
$ poetry update pytest

The remove command is used to remove the package from the project. To remove a development package the -D or --dev option must be specified.
$ poetry remove requests
$ poetry remove -D pytest

The build command builds the source and wheels archives.
$ poetry build my_new_project
$ poetry build

The publish command deploys the package built previously to either a public or private repository. Specifying the build option allows to build the package before publishing. By default the publish command publishes the package in pipy public repository. To switch to a private repository -r option is used along with the name of the private repository configured using the config command.
$ poetry publish
$ poetry publish -r privrepo -u username -p password

The config command enables to configure a private repository name with the repository url. 
$ poetry config repositories.privrepo https://private.repository

We can also store credentials for the private repository using the config command.
$ poetry config http-basic.privrepo username password

The credentials for pypi can also be configured using the previous command and replacing 'privrepo' by 'pypi' but it is now recommended to use API tokens to authenticate with pypi as below.
$ poetry config pypi-token.pypi my-token