
Git supports distributed workflows, offers safeguards against content corruption and allows to access repository history when offline. Git uses directed acyclic graph (DAG) to store content using different types of objects and also to store its history. The DAG allows git to efficiently determine common ancestors between two nodes especially during merges. Each git commit contains metadata about its ancestors were there can be zero or many (theoretically unlimited) parent commits. Git enables full branching capability using directed acyclic graphs to store content. The history of a file is linked all the way up its directory structure to the root directory, which is then linked to a commit node having one or more parents. Git merges the content of the two nodes in the DAG while merging two branches. Since git is a distributed system there is no absolute upstream or downstream repository in github. Branches in git are lightweight and similar to bookmarks in mercurial.
Below are the basic set of steps with commands to setup, commit and push using git.
> git init
Setting up user name and email address in one of the first steps to setup git. This is important since every Git commit uses this information. Using the --global option saves these settings and is used for every commit.
> git config --global user.name "John Doe"
> git config --global user.email johndoe@example.com
Provides git status command to see what is the current state of the project
> git status
Adds the specified file to the staging area in order to start tracking changes made to the corresponding file
> git add newfile.txt
Adds all the changes i.e. all the newly created text files using git add command with a wildcard.
> git add '*.txt'
Unstage the files in the staging area using the git reset command
> git reset folder/file.txt
Adds the staged changes into the repository by running the commit command with a message describing the changes.
> git commit -m "Add cute octocat story"
The --all or -a option of git commit tells gits to automatically stage the modified or deleted files except the newly added untracked files.
> git commit -a -m "comments"
Git's log is a journal that remembers all the changes committed so far by order.
> git log
Git log can also be used to search for a particular commit based on the commit message.
> git log --grep="search text"
Git log also enables to search commits by author.
> git log --author="John"
Git log provides --after or --before flags for filtering commits by date as below
> git log --after="2016-8-1"
> git log --after="yesterday"
> git log --after="2016-8-1" --before="2017-8-4"
> git log C:\code-folder\...\Code.java
Git log also uses the -- parameter to determine that subsequent arguments are file paths and not branch names. It uses the passed multiple file names to return all the commits that are affected by either of the passed file paths.
> git log -- Controller.java Service.java
Git log also provides -S<string> and -G<regex> flags to search the content of the commits by string or regular expressions respectively.
> git log -S"Hello, World!"
The --oneline flag condenses each commit to a single line. The --decorate option is used to display all of the references (e.g., branches, tags, etc) that point to each commit. The --graph option draws an ASCII graph representing the branch structure of the commit history. The --oneline, --decorate and --graph commands enables to see which commit belongs to which branch as below.
> git log --graph --decorate --oneline
Display all commits (regardless of the branch checked out) by using the –all option as below.
> git log --oneline --all
> git log --pretty --oneline -10
Display all the commits filtering all the merge commits using the --no-merges flag.
> git log --no-merges
To check the commit difference between local and the remote repository, we first fetch the latest changes and then compare the master with "origin/master" to get the variance between the two.
> git fetch
> git log master..origin/master
Navigation while checking the git commits using the log command may be tricky sometimes. Below are list of short cuts used to navigate in git command state:
Next line: return
Next page: space bar
Previous page: w
Quit viewing the diff: q
Help: h
Git maintains a reflog in background, which is a log of where your HEAD and branch references have been for the last few months. The reflog is displayed as below.
> git reflog
Whenever the branch tip is updated, Git stores such information in its temporary history. Older commits can be specified using this data, by using @{n} reference from the reflog output. For example the below command displays the fifth prior value of the HEAD for the current repository.
> git show HEAD@{5}
The git-diff-tree is a lower level command which compares the content changes using two tree objects. It can be used to list all the files modified within a given commit as below.
> git diff-tree --no-commit-id --name-only -r <sha1-commit-id>
Alternatively the git show command can be used to display all the files modified within the commit. Here the --no-commit-id suppresses the commit ID output and the --pretty argument specifies an empty format string to avoid the cruft at the beginning. The --name-only argument shows only the file names that were affected and the -r argument is to recurse into sub-trees.
> git show --pretty="" --name-only <sha1-commit-id>
The git list files command shows all the files in the index and the working tree.
> git-ls-files
The git list files command also allows to list files in a specified branch
> git ls-tree -r master --name-only
The -r option allows to recurse into subdirectories and print each file currently under version control.
Also we can also specify HEAD instead of master to get the list for any other branch we might be in.
> git remote add origin https://github.com/try-git/try_git.git
In order to update the existing repository URL already added the remote set-url can be used as below, It takes two arguments, namely the existing name and the new URL.
> git remote set-url origin https://github.com/new/new.git
Displays the information about the repository particularly the fetch and the push urls.
> git remote show origin
Cloning a git repository can be done using the git clone command, specifying the remote repository url and the local repository path.
> git clone git@github.com:whatever folder-name
> git clone git@github.com:whatever folder-name
The -b branch option along with single-branch option allows to clone only a single branch.
> git clone https://github.com/pranav-patil/spring-microservices.git -b release --single-branch
> git push -u origin master
When the repository parameter is missing, the current branch configuration is checked to determine the repository to be pushed else it is defaulted to origin.
> git push
The below push command explicitly specifies the remote repository and the remote branch.
> git push origin master
When git push refuses to update a remote ref that is not an ancestor of the local ref, or when the current value of remote ref does not match the expected value, then the --force option is used to disable these checks, and can cause the remote repository to lose commits. It is used to synchronize the remote repository with the local repository discarding the remote changes.
> git push origin HEAD --force
> git push origin master --force
The --force-with-lease option avoids unintentional overwrites as it updates the remote references only if it has the same value as the remote-tracking branch we have locally, else failing with stale info message.
The --set-upstream or -u option sets the association between local branch and the remote branch, so that we can use "git pull" without specifying the remote branch name everytime. It can be used with branch or push command as below.
> git push --set-upstream origin <branchname>
> git branch --set-upstream <branchname> origin/<branchname>
The git fetch command simply gets all the new changes from the specified remote repository, by default from the origin repository.
> git fetch upstream
The --all option for git fetch and also pull enables to fetch the current branch from all remote repositories.
> git fetch --all
The git pull command fetches the changes from the origin repository from the master branch and merges them with the current branch.
> git pull origin master
Git's pull command first fetches the latest changes from the remote repository similar to executing the "git fetch" command. It then follows with "git merge FETCH_HEAD" command to merge the retrieve branch heads with the current branch. To avoid merges, and perform rebase which rewinds the local changes on top of the latest changes, as below:
> git pull --rebase
Below command gets the changes from the upstream repository from master branch in the current branch and rebase the local changes on top of it.
> git pull -r upstream master
In order to make the rebase option as default for all the pull commands, we set this in the configuration for new branch as below:
> git config branch.autosetuprebase always
Enabling pull rebase by default for existing branches can be done as below:
> git config branch.YOUR_BRANCH_NAME.rebase true
In order to carry out merge instead of rebase explicitly, we use
> git pull --no-rebase
Git uses environment variables http_proxy and https_proxy for accessing remote repositories through proxy configuration if required. The no_proxy environment vairable is defined for accessing any internal repository or excluding proxy settings for any repository.
> git diff HEAD
To view the changes within staged files a --staged option is added to diff command :
> git diff --staged
View all the differences or difference for single file with the previous commit hash
> git diff CHANGE_HASH
> git diff CHANGE_HASH -- repo/src/java/Sample.java
Compares content and mode of blobs between the cache and repository
> git diff cache
To list all the files to be pushed in the origin repository on master branch, the below diff command with cache is used. The --stat option displays the ratio of added and removed lines.
> git diff --stat --cached origin/master
The --numstat option is similar to --stat and shows the number of added as well as deleted lines in decimal notation along with the pathname without abbreviation. Hence the below command displays the full file paths of the files that are changed.
> git diff --numstat origin/master
> git diff-tree --no-commit-id --name-only -r d9ce760
> git show --pretty="format:" --name-only d9ce760
To compare the same file between two different commits (not contiguous) on the same branch, we specify the start and end commit with git diff.
> git diff HEAD^^ HEAD pom.xml
> git diff HEAD^^..HEAD pom.xml
> git diff HEAD^^ HEAD pom.xml
> git diff HEAD^^..HEAD pom.xml
To compare a specific file from two different branches, we use the below diff command.
> git diff mybranch master -- myfile.java
> git diff mybranch..master -- myfile.java
> git checkout -- <target>
> git checkout -- octocat.txt
Checkout the local repository to a particular changeset
> git checkout <git-changeset>
Checkout the previous commit. ^n selects the nth parent of the commit. On the windows command prompt, we need two ^'s because ^ is the escape character.
> git checkout {commit}^^1
The HEAD is a default variable which is a reference to the current (most recent) commit in git. Many git commands, such as git log and git show use HEAD as the commit to report on. The ~ character (“tilde”) character is used to refer to the parent of the commit. The contents of the git HEAD variable is stored in a text file in the .git/HEAD. HEAD^ (which is short for HEAD^1) means in git that the first parent of the tip of the current branch. Git commits can have more than one parent. HEAD^ is short for HEAD^1, and one can also address HEAD^2 and so on as appropriate. We can get to parents of any commit, not just HEAD. Also we can move back through generations: for example, master~2 means the grandparent of the tip of the master branch, favoring the first parent in cases of ambiguity. These specifiers can be chained arbitrarily , e.g., topic~3^2.
Difference between Git ^ (caret) and ~ (tilde)

ref~ is shorthand for ref~1 and means the commit's first parent.
ref~2 means the commit's first parent's first parent, i.e. the commit's grandparent.
ref~3 means the commit's first parent's first parent's first parent. And so on.
ref^ is shorthand for ref^1 and means the commit's first parent. Hence ref~ and ref^ are equivalent.
But ref^2 means the commit's second parent as commits can have two parents when they are a merge.
Below is the summary of all different commit references with their meaning:
- HEAD~2 : first parent of the first parent, or grandparent
- HEAD^2 : second parent of HEAD, if HEAD was a merge, otherwise illegal
- HEAD@{2} : refers to the 3rd listing in the overview of git reflog
- HEAD~~ : 2 commits older than HEAD
- HEAD^^^ : first parent of the first parent of the first parent
View all the local branches in the local repository.
> git branch branchname
> git checkout -b branchname
Delete the specified git branch using the -d option with the git branch command:
> git branch -d branchname
To search for all the branches containing the particular commit, the contains option can be used.
> git branch --contains <commit>
The deleted branch can be recovered using the git hash <sha1-commit-id> for the branch.
> git branch branchName <sha1-commit-id>
Switch the branch in current repository
> git checkout branchname
Git allows to tag specific commits in the history. The tag command is used to list all the available tags.
> git tag
A tag is created by passing the parameter to the tag command and its deleted with the -d option as below.
> git tag release01
> git tag -d release01
A branch can be tagged as below by adding the branch name parameter with the tag command. This can later be used to checkout the branch instead of specifying the branch name.
> git tag archive/<branchname> <branchname>
It also allows to search all the available tags starting with "v1.8.5" series as below.
> git tag -l "v1.8.5*"
To display the commit details and file changes for the corresponding tag, the git show command is used.
> git show v.1.8.5
The git rm command removes files from the working tree and from the index or staging area. It not only removes the actual files from disk, but will also stage the removal of the files.
> git rm '*.txt'
The git rm command with the cached option only removes the files from the index and keeps the files in the working copy.
> git rm --cached notes.txt
Merges the changes from the specified branch name to the current checked out branch (master in this case). The current branch should be checked out to the specified current branch name in order to merge with the corresponding branch name.
> git checkout current_branch_name
> git merge branchname

Fast-forward merging updates the HEAD (along with the index) to point at the named commit, without creating an extra merge commit. It is recommended for short-lived branches. Non-fast-forward merging enables to have plain history with straight branch, without complex branching making the history easier to understand and easier to revert a group of commits.
By default fast-forward merging is enabled which can be suppressed by specifying -no-ff option as below.
> git merge --no-ff
In any non fast-forward merge, the merged version is committed which reconciles the changes to be merged from all branches and the HEAD, index, and working tree are updated to it. In case the reconciliation of the changes fails, the HEAD points to the same place while the MERGE_HEAD points to the other branch head and the paths which merged cleanly are updated both in the index file and in the working tree. In conflicting scenario, the index file records up to three versions, common ancestor, HEAD changes and MERGE_HEAD changes. The working tree files contain the result of the "merge" i.e. 3-way merge results with conflict markers. The merge --abort command enables to recover from the complex conflicts and start over the merging process as below.
> git merge –abort
> git reset --hard
> git reset --hard HEAD~1
> git reset --hard <sha1-commit-id>
Git reset along with master branch is used to remove all the working changes and local commits on the master branch. The below command discards all local commits and working changes.
> git reset --hard origin/master
Resets the current branch pointer to the specific commit (e.g. 6th commit from the latest HEAD) removing all files from working tree and staging area.
> git reset --hard HEAD@{5}
> git reset --soft
Removes the last commit keeping all the file changes as working changes.
> git reset --soft HEAD~
> git reset --soft HEAD~1
The mixed option for git reset only discards the index or staged changes without affecting the working tree changes.
> git reset --mixed
To remove the recently committed changes git reset command is used on the HEAD as below:
> git reset --hard HEAD^
To remove changes for a particular file from the last commit, or to amend the last commit to un-add a file, the below command is used. HEAD^ allows the file to access its content in the previous commit before the last one.
> git reset HEAD^ path/to/file/to/revert
Further, using git force push can remove commits from remote repository, mostly helpful to remove any sensitive data. Read for more details.
> git push origin +master
After reset the commit removed goes to a “dangling” state and still resides in git’s datastore. Its waiting for the next garbage collection to clean it up. Hence the commit can still be restored unless git gc is ran which cleans all the dangling commits. The git fsck command is part of Maintenance and Data Recovery Utility for git. The fsch command with the --lost-found option can be used to lookup all the dangling commits.
> git fsck --lost-found
The git reflog command can also be used to check for dangling commits. The git merge command passing the SHA1 of the commit to recover can recover the specified commit with HEAD pointing to it.
> git merge <sha1-commit-id>
Create three separate revert commits:
> git revert <sha1-commit-id-1> <sha1-commit-id-2> <sha1-commit-id-3>
Reverts the last two commits wihtin the ranges:
> git revert HEAD~2..HEAD
Reverts a merge commit
> git revert -m 1 <merge-sha1-commit-id>
Git allows to delete the local untracked files from the current branch using the clean command. The -n or --dry-run option enables to preview the files which will be deleted.
Deletes the local un-tracked directories from the current branch with the -d option.
> git clean -f -d
Deletes the local un-tracked or ignored files from the current branch with the option -X option.
> git clean -f -X
Deletes the local ignored and non-ignored files both from the current branch with the option -x option.
> git clean -f -x
> git am
Finds the head commit of the branch before the rebase process was started:
> git reflog
Adding a tag for specific commit e.g. "7108c3c" is done using the tag command.
> git tag -a v1.2 7108c3c -m "Message"
Allows to view or browse the git documentation for the specified command online
> git help push
> git help push
Stashing enables to save all the modified and tracked files on the stack on unfinished changes in order to get to the clean branch state, in order to pull new changes from remote repository. The files in the stack can later be applied to the working directory to get back to the previous dirty state of working directory.
Pushes a new stash on the stack with all the tracked working changes.
> git stash
To view all the stashes stored on the stack, we use
> git stash list
Lists one line for each stash
> git stash list -p
> git stash apply
Shows the contents of one particular stash in the stack
> git stash show stash@{0}
Removes all the stashed states from the stack
> git stash clearApplies the previous stash in the stack by naming it using its index stack
> git stash apply stash@{0}
Stashing only un-staged changes in Git
> git stash save --keep-index
Rebasing re-writes the project history by creating brand new commits for each commit in the original branch. Its major benefit is a much cleaner project history, eliminating the unnecessary merge commits by creating a perfectly linear project history. The golden rule of git rebase is to never use it on public branches. For example, never rebase master onto your feature branch as it will move all of the commits in master onto the tip of feature.
The below rebase command moves the entire feature branch to begin on the tip of the master branch, effectively incorporating all of the new commits in master.
> git checkout feature
> git rebase master
The local commits are applied on top of the upstream/master as below.
> git rebase upstream/masterThe below command rebases the topic branch onto the base branch by replaying topic branch onto the base branch.
> git rebase basebranch topicbranch
Interactive rebasing enables to alter the commits as they are are moved to the new branch and is used to clean up a messy history before merging a feature branch into master. Interactive rebase also allows to modify from the list of previous commit history which have not yet been pushed to the remote repository. From the list of commits being rebased, the text is changed from pick to edit next to the hash of the commit to be modified. Git then prompts to change the commit. This is mainly used to change the commit message, change the commit author, quash two commits into a single commit and in many other cases.
Consider changing the author of the recent commit, we invoke the git interactive rebase using -i option:
> git rebase -i origin/master
Git will rebase, stopping at each commit we marked as pick. Now for each commit marked we execute:
> git commit --amend --author="Philip J Fry <someone@example.com>"
> git rebase –continue
> git commit --amend --reset-author
The rebase command has the interactive mode "-i" which enables to squash multiple smaller commits into a single larger commit. Only non-pushed local commits should be squashed within the interactive mode, to prevent conflicts and rewriting of history. Below rebase command enables to wrap last 4 commits together into a single commit:
> git rebase -i HEAD~4
Then we mark the commits to be merged as squash, and save the changes using ":wq".
Git then allows to modify the new commit’s message based on the rest of the commits involved in the process. So we edit the commit messages to a single commit message and exit the command line using ":wq" saving the changes to finalize the rebase squashing to a single commit.
Git then allows to modify the new commit’s message based on the rest of the commits involved in the process. So we edit the commit messages to a single commit message and exit the command line using ":wq" saving the changes to finalize the rebase squashing to a single commit.
Similarly, the last commit can be updated to add a new message as below:
> git commit --amend -m "New commit message"
The amend option for git commit also by default adds all the staged file changes to the recent local commit.
> git commit --amend
The last commit on the local repository can be removed by executing git rebase and deleting the second line within the editor window that pops up.
> git rebase -i HEAD~2
Sometimes a feature branch is created from another feature branch, rather than creating from the master branch. The --onto option of rebase command enables to fix this by allowing to transplant a given branch based on one branch to another as below.
> git rebase --onto master oldparent newbranch
In Git there are two places the configurations can be stored. In a global ~/.gitconfig and in a local per-repo .gitconfig which is inside the .git directory. Each local project repository can be configured to set the commit user name and email as below:
> cd git-codebase
> git config user.name "John Adams"
> git config user.email adamsjohn@emprovise.com
In order to set the name and email address in global configuration we can run the above command with the --global option which saves the values in the global configuration file, ~/.gitconfig. Every Git commit uses then uses this user name and email information in global configuration (unless overridden by local project), and it’s immutably baked into the commits.
We can also override the user name and email address by passing custom values to the commit command.
> git -c "user.name=John Dalton" -c "user.email=johndalton@gmail.com" commit -m "Some message" --author="John Dalton<johndalton@gmail.com>"
The git config command show the current global configuration.
> git config --list
Cherry Picking in Git enables to cherry pick a specific commit from another branch. This could be useful if we already have a fix on the master branch that we need to move to the production branch. This is done as below:
1) Checkout the commit we need to work from
> git checkout <sha1-commit-id>
2) Cherry Pick the desired commit. It applies the previous commit to the top of current branch.
> git cherry-pick <sha1-commit-id>
Git provides ability to create patches which could be essentially applied to another branch or repository.
Creates a new file patch.diff with all changes from the current branch against master.
> git format-patch master --stdout > C:\patch.diff
Normally, git creates a separate patch file for each commit, but with --stdout option it prints all commits to the standard output creating a single patch file. In order to have seperate patch files for each commit, the --stdout option can be ignored.
Creates a patch file for each commit, for all commits since the referenced commit (not including it)
> git format-patch HEAD~~
Applies the patch on current branch using a git am command ignoring any white space differences:
> git am --ignore-space-change --ignore-whitespace C:\patch.diff
In case of conflicts, the git am command may fail, and can be aborted using "--abort" or skipped using "--skip" option. By default git apply fails the whole patch and does not touch the working tree when some of the hunks do not apply. The reject option in git-apply makes it apply the parts of the patch that are applicable, leaving the rejected hunks in corresponding *.rej files. The rejected files can then be compared with the with the conflicting files, edited and finally the fixed files added to the index.
> git apply PATCH --reject
// compare rejected files with conflicting files and update
> git add FIXED_FILES
> git am --resolved
A git repository stores commits in a transitive (real) closure from the reachable items through to every commit. Hence it’s not possible to remove a commit and therefore the trees and blobs that make up that repository. So when a branch is deleted the pointer to the commit is deleted but the actual commit still persists. Further the git reflog stores the a list of the previous branch pointers even when the branch is deleted. The git gc command can be used to repack the repository into a more efficient structure and export non-referenced commits as loose objects only if there’s no existing pointer referencing to the commit. The gc command cleanups the unnecessary files and optimizes the repository in order to maintain a good disk space utilization and good operating performance:
> git gc
The git fsck command enables to check whether all objects are present as expected. Also
git fsck --unreachable shows the commits which are no longer reachable due to deleted branches or removed tags. Internally the gc command invokes git prune which evicts the objects which are no longer referenced to any commits (it does not remove references). It deletes data that has been accumulated in Git without being referenced by anything.
> git fsck --unreachable
> git prune
The git remote prune command is used to delete/remove any stale remote-tracking branches which are still locally available, but have already been removed from the remote repository referenced by name (origin). It enables to remove remote references under a particular remote unlike git fetch --prune command.
> git remote prune origin
Similar to git remote prune, git fetch --prune only deletes remote-tracking branches locally still available.
> git fetch origin --prune
The commands git remote update --prune, git remote prune, git fetch --prune, all operate on remote branches (refs/remotes/..).
To git ignore watching/tracking a particular dir/file the update-index command is used as below:
> git update-index --assume-unchanged <file>
To undo ignoring the files and to track them using version --no-assume-unchanged option is used.
> git update-index --no-skip-worktree <file>
Verify the key being used for the github host using the ssh command.
> ssh -v github.com
The http.sslVerify configuration for SSL when set to false, disables the verification of SSL certificate while fetching and pushing files over Https. The global flag will set this configuration to all the git repositories.
> git config http.sslVerify false
> git config --global http.sslVerify false
The ssl backend can be configured to use with git, which can potentially be openssl or schannel. SChannel is the built-in Windows networking layer which will use the Windows certificate storage mechanism when configured.
> git config --global http.sslbackend schannel
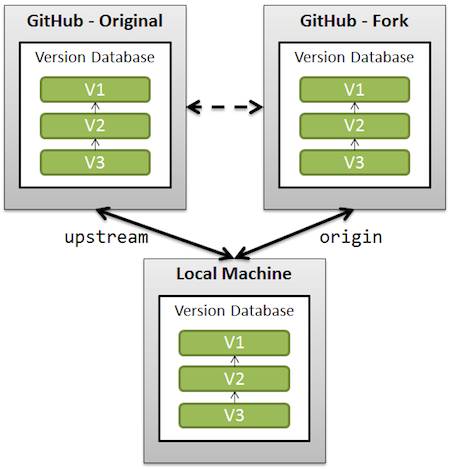 Forking in git is nothing more than a clone on the GitHub server side without the possibility to directly push back to original repository, hence allowing to make changes without impacting the original repository. Also the fork queue feature allows to manage the merge request to the original repository. The original repository which is forked is referred as upstream while the fork or clone of original repository is referred as origin. The fork can be synced with the original project by adding the original project as a remote, fetching regularly from the original project or rebasing the current changes on top of the branch with the updated changes. To clone the forked repository locally, clone the repository from the git user's copy as below:
When a git repository is cloned, it has a default remote called origin that points to the fork on Git, and not towards the original repository from which it was forked from. In order to keep track of the original repository add another remote named upstream as below:
> git remote add upstream https://github.com/user/repo.git
In case to clean up the remote fork and restart from the upstream we use the below set of commands.
> git fetch upstream
> git checkout master
> git reset --hard upstream/master
> git push origin master --force
Git gilter-branch command enables to rewrite branches by applying custom filters on each revision, modifying each tree and each commit based on the filters specified. It only rewrites the positive refs mentioned in the command line.
> git filter-branch -f --env-filter '
if [ "$GIT_COMMITTER_NAME" = "oldname" ];
then
GIT_COMMITTER_NAME="newname";
GIT_COMMITTER_EMAIL="newaddr";
GIT_AUTHOR_NAME="newname";
GIT_AUTHOR_EMAIL="newaddr";
fi
if [ "$GIT_AUTHOR_NAME" = "oldname" ];
then
GIT_COMMITTER_NAME="newname";
GIT_COMMITTER_EMAIL="newaddr";
GIT_AUTHOR_NAME="newname";
GIT_AUTHOR_EMAIL="newaddr";
fi
' -- --all
The gilter-branch command allows to update all past commits changing the author and committer without losing history.
> git filter-branch -f --env-filter "
GIT_AUTHOR_NAME='Jack Dorcey'
GIT_AUTHOR_EMAIL='jack.dorcey@emprovise.com'
GIT_COMMITTER_NAME='Jack Dorcey'
GIT_COMMITTER_EMAIL='jack.dorcey@emprovise.com'
" HEAD
The gilter-branch command also enables to prune specific/all directories, keeping the history of only specific sub-directories. The prune-empty option removes empty commits, if there are exactly one or zero non-pruned parents, generated by filters from filter-branch command. The --subdirectory-filter option rewrites the repository such that the /module_name had been its project root, and discard all other history as below.
> git filter-branch --prune-empty -f --subdirectory-filter module_name
After using git filter-branch, git still retains a backup copy of the history of the repo in refs/original in case the changes needed to be reverted. If assured that everything went smoothly, the backed up ref can be removed as below:
> git update-ref -d refs/original/refs/heads/master
Git allows to configure aliases for frequently used commands which is configured in the global git config file using below command (e.g. setting alias co for checkout).
> git config --global alias.co checkout
There are multiple merge tools available which can be integrated to git, by configuring in the global git configuration file. Below is a sample git configuration for Diffmerge tool for windows.
[diff]
tool = diffmerge
[difftool "diffmerge"]
cmd = 'C:/diffmerge/sgdm.exe' \"$LOCAL\" \"$REMOTE\"
[merge]
tool = diffmerge
[mergetool "diffmerge"]
trustExitCode = true
cmd = 'C:/diffmerge/sgdm.exe' --merge --result=\"$MERGED\" \"$LOCAL\" \"$BASE\" \"$REMOTE\"